将 VitePress 文档数据向量化,配合 RAG 实现 AI 助手插件
本文最后更新于 2026年4月2日 上午
VitePress 是一个很不错的文档引擎,将 Markdown 转化为静态网站,具有快速部署、易于维护的特点。 那么,既然是文档内容,普通的搜索还是有些不够智能,如果我们将 Markdown 数据向量化,就可以利用向量数据库进行高效的检索和生成,从而实现 AI 助手插件。
RAG 与 MCP
RAG(Retrieval-Augmented Generation)是一种结合了检索和生成的 AI 技术架构。它通过先检索相关文档片段,再基于这些片段生成回答,有效解决了 LLM(Large Language Model) 的知识局限性和幻觉问题。
随着 Agentic RAG(基于智能体的检索增强生成)的发展,大模型通过 Tool Calling(工具调用) 主动决定何时检索知识库。这就引出了最近火热的 MCP (Model Context Protocol)。MCP 进一步规范了大模型访问外部工具、知识库的标准化途径。
当然,不论怎么演进,检索的基础依然是把文档内容全部数据向量化,排除无关信息,标注语义标签:
flowchart LR
    A[🔍 文档解析] --> C[✂️ 文本分块]
    C --> D[🧠 向量化处理]
    D --> E[💾 向量数据库存储]

    F[👤 用户提问] --> G[ 查询向量化]
    G --> H[🎯 相似度检索]
    H --> J[🤖 LLM 生成回答]
    J --> K[💬 智能回复]

    E --> H

    subgraph 数据准备阶段
        direction TB
        A
        C
        D
        E
    end

    subgraph 查询响应阶段
        direction TB
        F
        G
        H
        J
        K
    end

    classDef dataPrep fill:#e8f5e9,stroke:#4caf50,stroke-width:2px,color:#2e7d32
    classDef queryResp fill:#e3f2fd,stroke:#2196f3,stroke-width:2px,color:#1565c0
    classDef storage fill:#f3e5f5,stroke:#9c27b0,stroke-width:2px,color:#7b1fa2
    classDef ai fill:#ffebee,stroke:#f44336,stroke-width:2px,color:#c62828
    classDef user fill:#e0f2f1,stroke:#009688,stroke-width:2px,color:#00695c

    class A,C dataPrep
    class D,E storage
    class F,G,H,I user
    class J ai
从上图也可以看出,最后 RAG 的效果受限于:
- 数据向量化的能力: 我们一般用向量数据库去存储数据进而把数据进行向量化(隐式调用向量数据模型,不同的模型效果其实也不一样)。
- LLM 的能力: 前主流的 LLM 模型都具备一定的知识库能力,但不同的 LLM 模型效果也不同,就如 Claude 和 DeepSeek 的效果肯定是不一样的。
当然,文档内容是否全面、质量高低是更重要的因素。
本次实践,我们就把 薄荷输入法 文档数据向量化,然后再用 Go 构造 RAG 插件,并在VitePress 中添加 AI 助手插件:
需要注意,除了 VitePress,你还需要准备:
- LLM 模型 API: 用于 RAG 检索,推荐使用 DeepSeek 的 API,比较省钱。
- 向量化数据模型: 可以直接使用后文 CNB 的知识库流水线,自动向量化数据并提供 API。
向量化
向量化是 RAG 系统的基础,它将文本转换为高维向量表示,进而实现更精度的语义识别、查询和生成。
比如: 我们平时阅读文章时,会看到很多词条,比如“人工智能”、“深度学习”、“机器学习”等等,这些词条就是文本,我们可以通过向量化技术将其转换为向量表示,进而实现更精准的语义识别、查询和生成;亦或者对内容词条进行聚类,形成知识库,进而实现更精准的语义识别、查询和生成:
graph TB
    %% 定义样式
    classDef docStyle fill:#e3f2fd,stroke:#1976d2,stroke-width:2px,color:#000
    classDef processStyle fill:#f3e5f5,stroke:#7b1fa2,stroke-width:2px,color:#000
    classDef vectorStyle fill:#e8f5e8,stroke:#388e3c,stroke-width:2px,color:#000
    classDef dbStyle fill:#fff3e0,stroke:#f57c00,stroke-width:2px,color:#000
    classDef modelStyle fill:#fce4ec,stroke:#c2185b,stroke-width:2px,color:#000

    %% 文档处理流程
    A[📄 原始文档<br/>文本、PDF、网页等] --> B[✂️ 文档分块<br/>Chunking]
    B --> C[🧮 向量化处理<br/>Embedding]

    %% 向量化模型
    D[🤖 向量模型<br/>Word2Vec/BERT/GPT等] --> C

    %% 向量数据库存储
    C --> E[(🗄️ 向量数据库<br/>Vector Database)]

    %% 向量数据库功能
    E --> F[🔍 相似度搜索<br/>Similarity Search]
    E --> G[📊 向量索引<br/>Vector Index]
    E --> H[⚡ 高效检索<br/>Fast Retrieval]

    %% 查询处理
    I[❓ 用户查询] --> J[🔍 查询向量化]
    D --> J
    J --> F

    %% 应用样式
    class A,I docStyle
    class B,J processStyle
    class C vectorStyle
    class E,F,G,H dbStyle
    class D modelStyle

    %% 分组展示
    subgraph "📚 向量化数据处理"
        direction TB
        A
        B
        C
        D
    end

    subgraph "🗄️ 向量数据库功能"
        direction TB
        E
        F
        G
        H
    end

    subgraph "🔎 查询处理"
        direction TB
        I
        J
    end
什么是向量数据库,可以参考: 什么是向量数据库 – Cloudflare
向量化数据需要 Embedding 模型,常见的模型有 Word2Vec、GloVe、FastText、BERT、ELMo、GPT、T5 等。具体可以看看 python 配合 tensorflow 的向量模型库:TensorFlow Embedding。
可以直接使用向量数据库这样的 SaaS 产品,比如:
向量流水线
最近发现 CNB 有提供知识库构建服务(目前是免费的),其实就是 SaaS 的向量数据服务:
我们只需要把 Markdown 文档作为 Git 仓库托管到 CNB,然后使用 CNB 的流水线向量化数据;就可以使用 CNB 的知识库 API 接口,使用关键词进行检索:
flowchart LR
    A[📁 Git 仓库<br/>Markdown 文档] --> B[🔄 CNB 流水线<br/>自动构建知识库]
    B --> C[💾 知识库<br/>向量化存储]

    D[🔍 用户查询] --> C
    C --> E[💬 智能回答<br/>包含来源链接]

    %% 样式定义
    classDef source fill:#e3f2fd,stroke:#1976d2,stroke-width:2px,color:#000
    classDef pipeline fill:#f3e5f5,stroke:#7b1fa2,stroke-width:2px,color:#000
    classDef storage fill:#e8f5e8,stroke:#388e3c,stroke-width:2px,color:#000
    classDef query fill:#fff3e0,stroke:#f57c00,stroke-width:2px,color:#000

    %% 应用样式
    class A source
    class B pipeline
    class C storage
    class D,E query
CNB 知识库
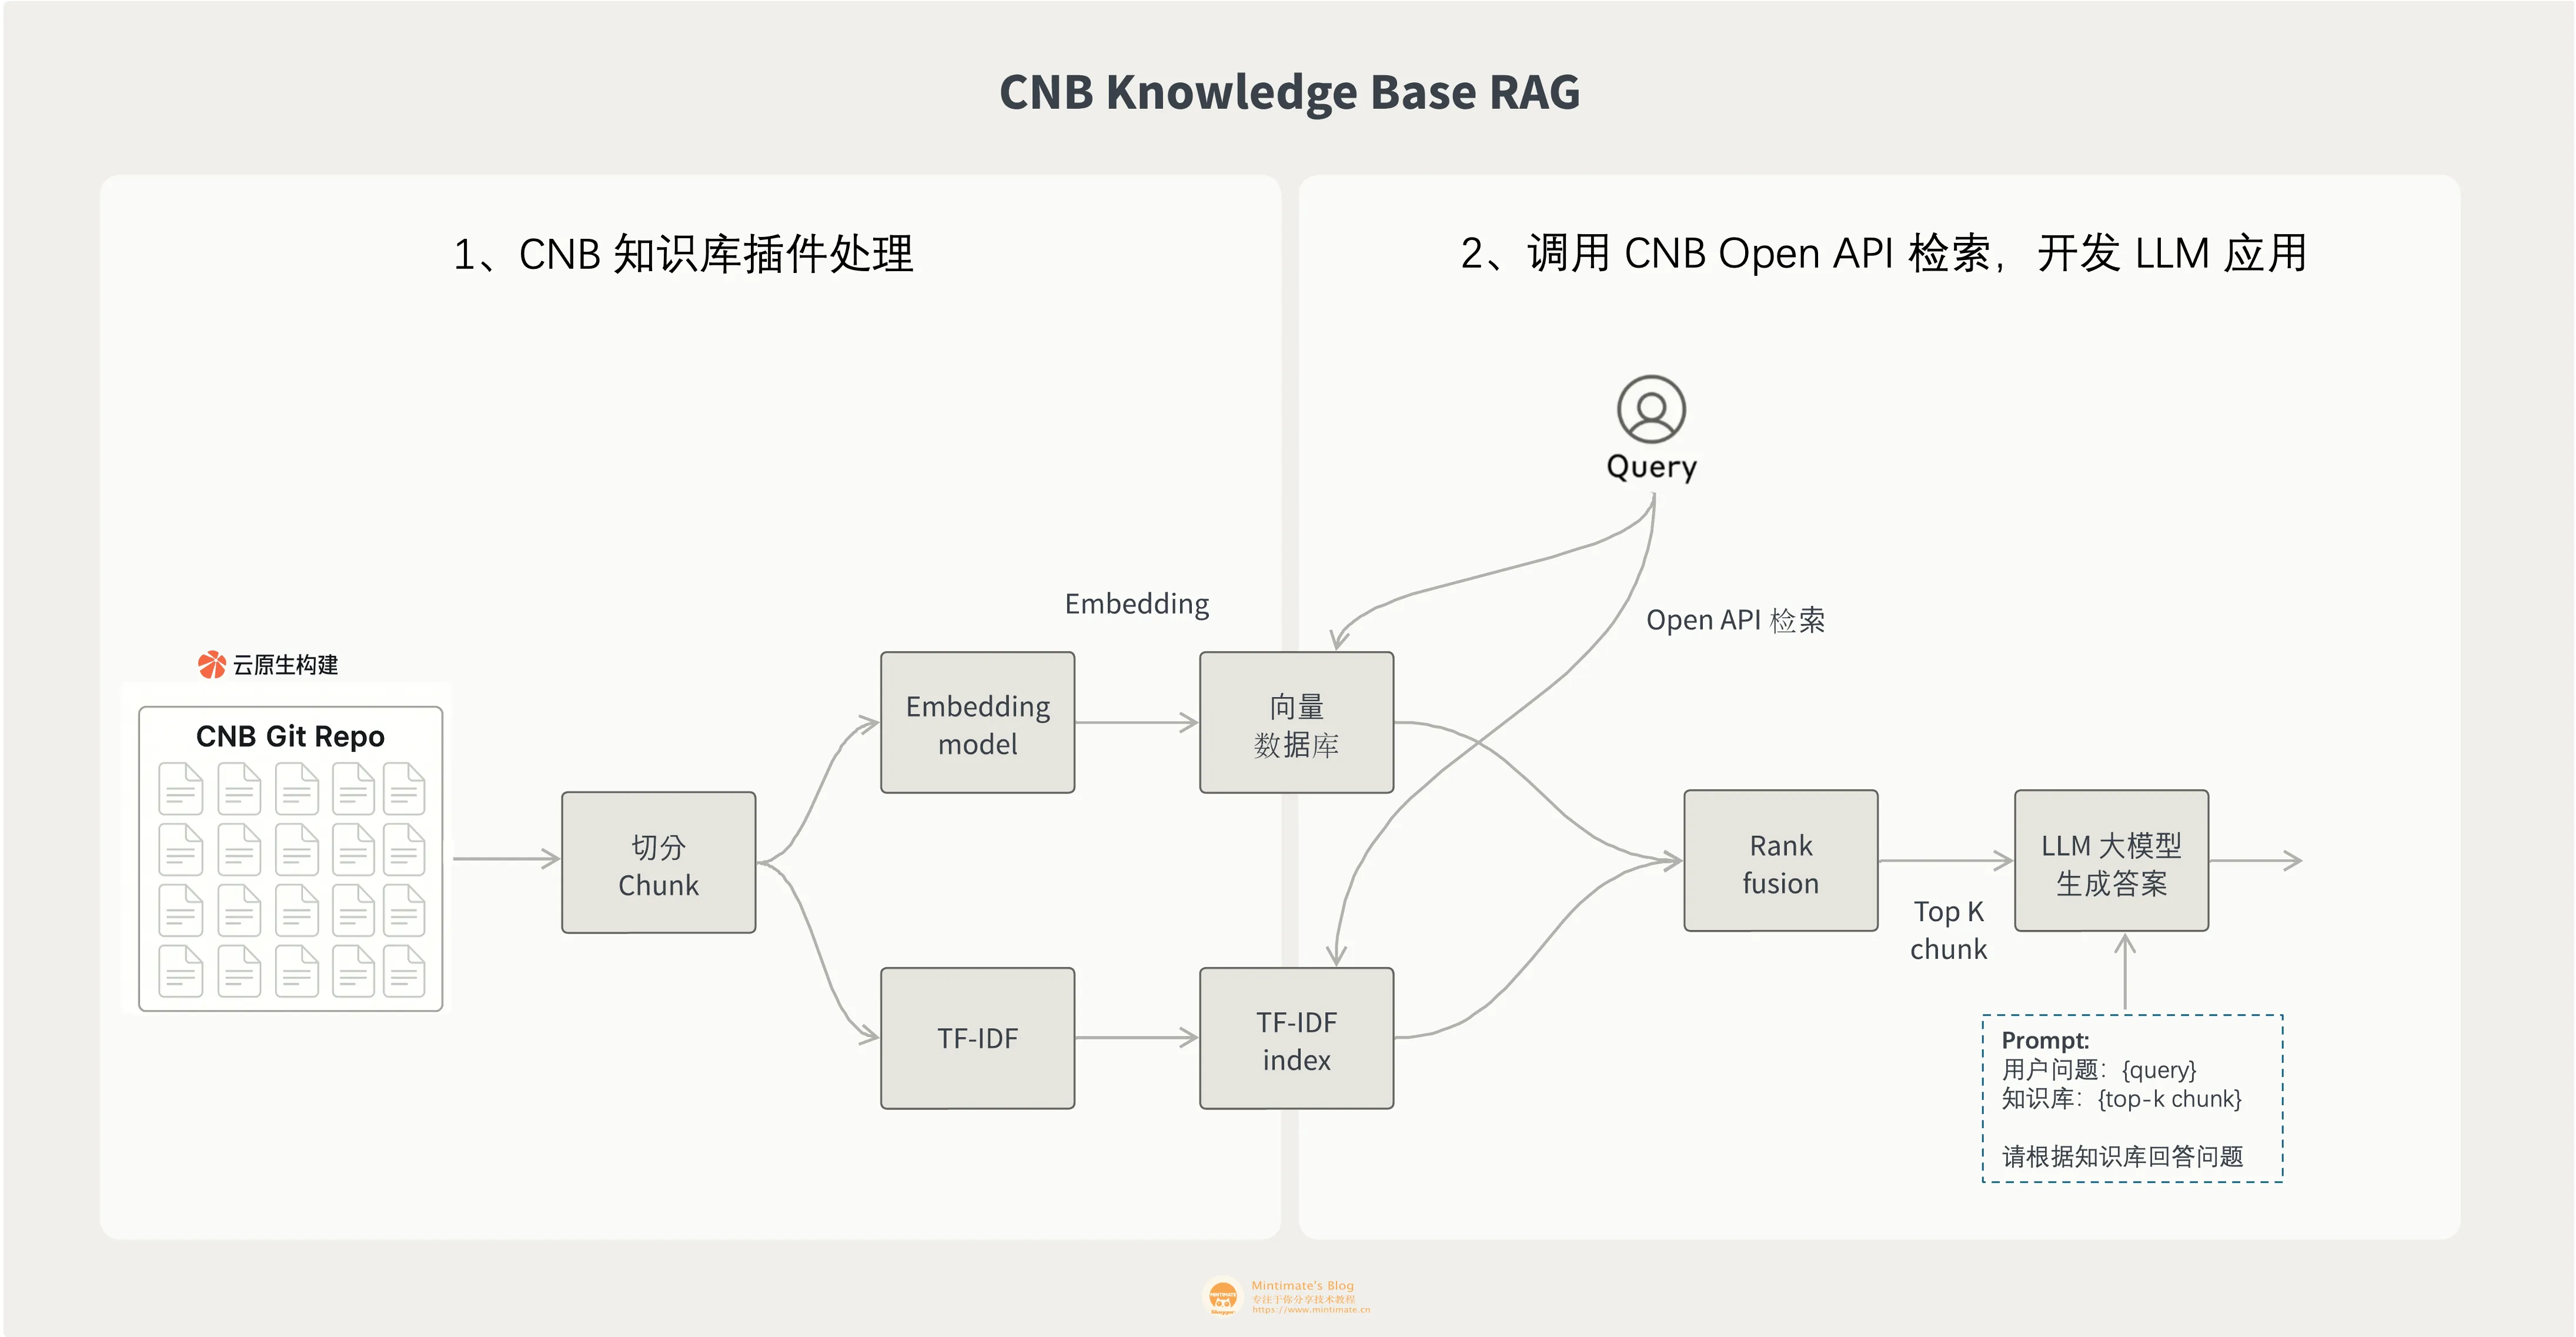
到了我们本次的正题,首先就是用 CNB 的知识库向量化我们的 VitePress 项目内 Markdown 文档,向量后,可以使用 CNB 的 API 接口进行检索,接口调用的效果如下:
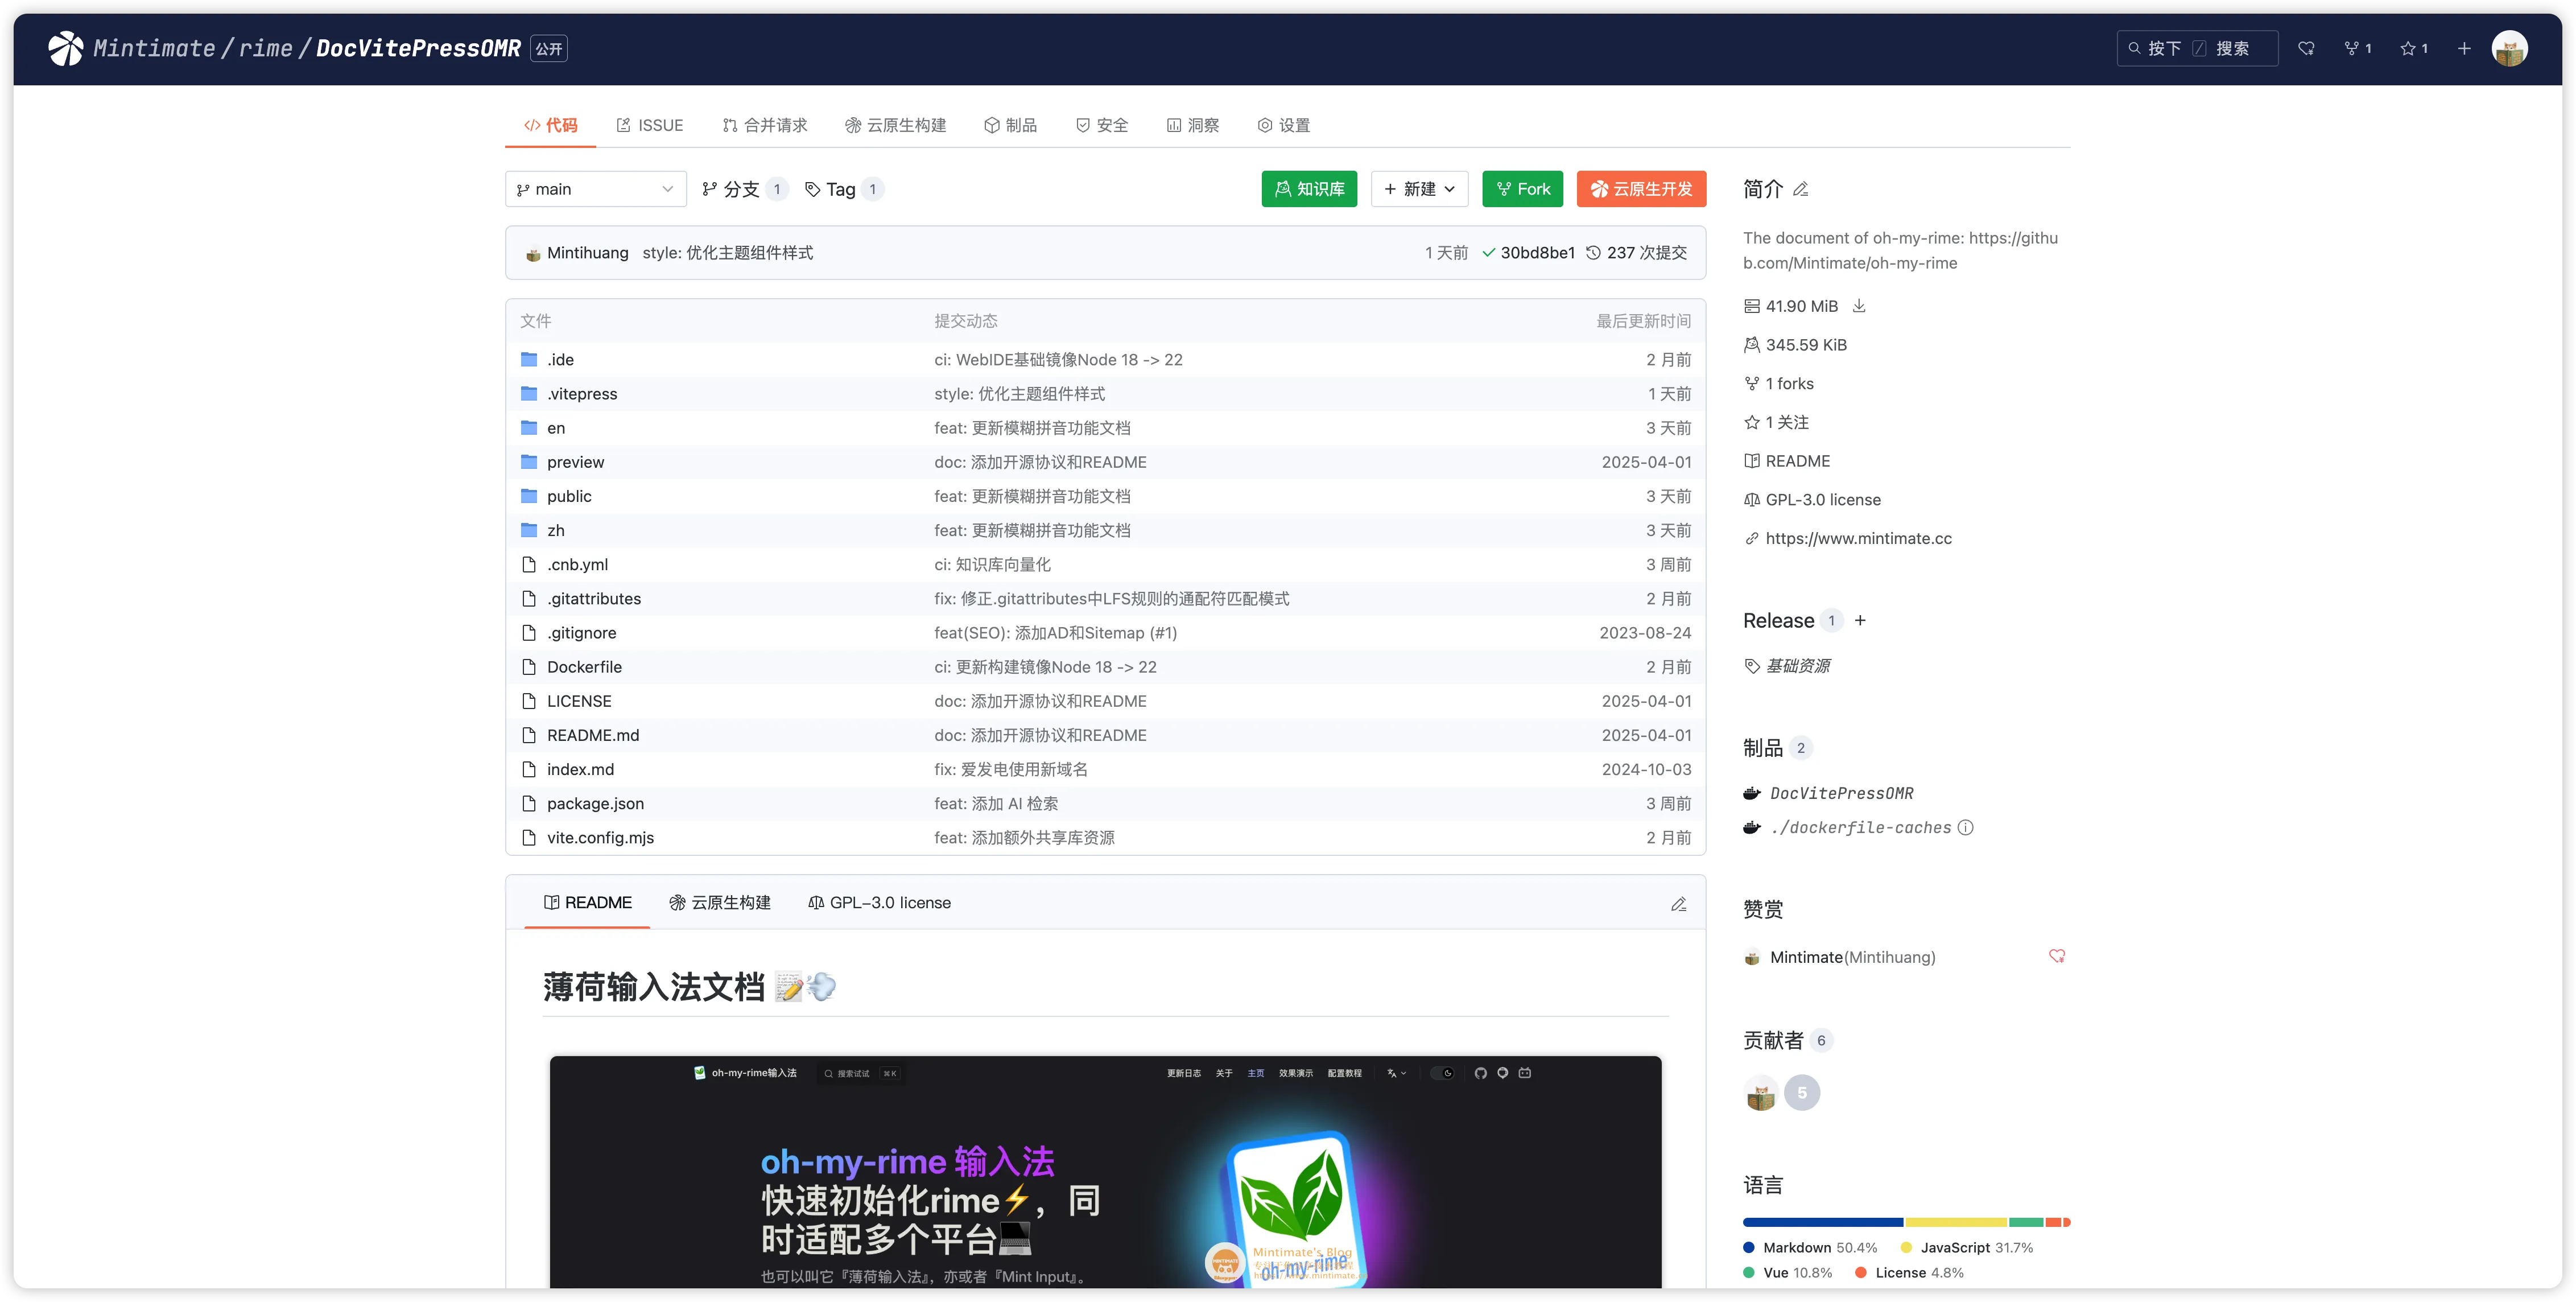
使用 CNB 的知识库很简单,你可以和我一样直接把 VitePress 文档项目托管到 CNB:
知识库流水线
正如 CNB 的流水线文档所说,CNB 的知识库流水线可以自动向量化数据并自动存储:
1 | |
上述的意思:
- 当代码仓库 main 分支有新的提交时,触发流水线。
- 使用
cnbcool/knowledge-base知识库插件镜像,向量化所有 Markdown 文件。
参考我的 VitePress: Mintimate/rime/DocVitePressOMR/.cnb.yml
触发效果
当代码仓库 main 分支有新的提交时,触发流水线:
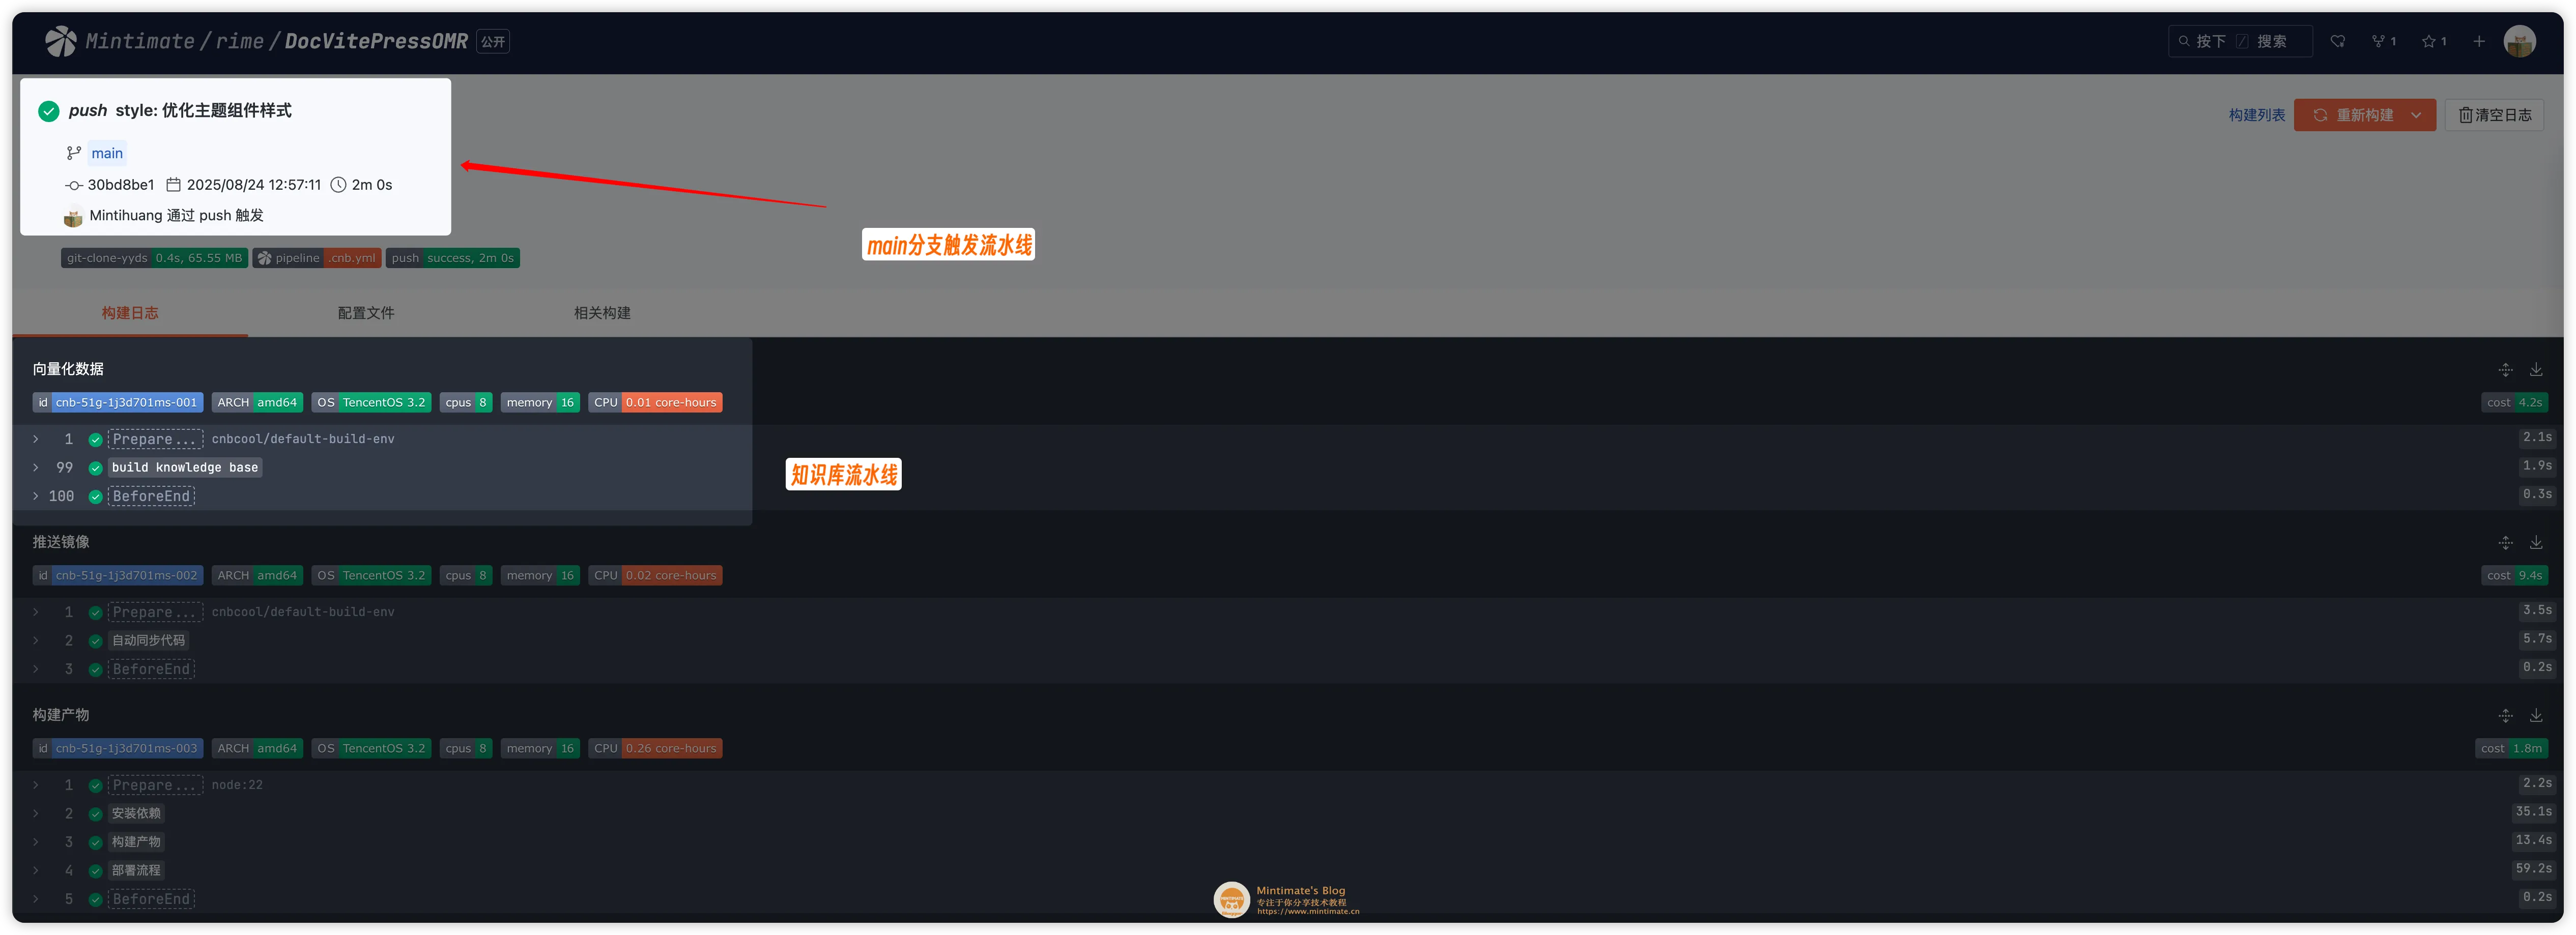
流水线构建完毕后,前台还可以看到一个有意思的“彩蛋”:

你可以直接点击这个“彩蛋”按钮进行前台知识库的检索。但是通常情况肯定使用 CNB 的知识库 API 在其他应用上集成,比如 VitePress。
知识库 API
参考 CNB 的 API 文档:
比如,查询知识库的信息就是:
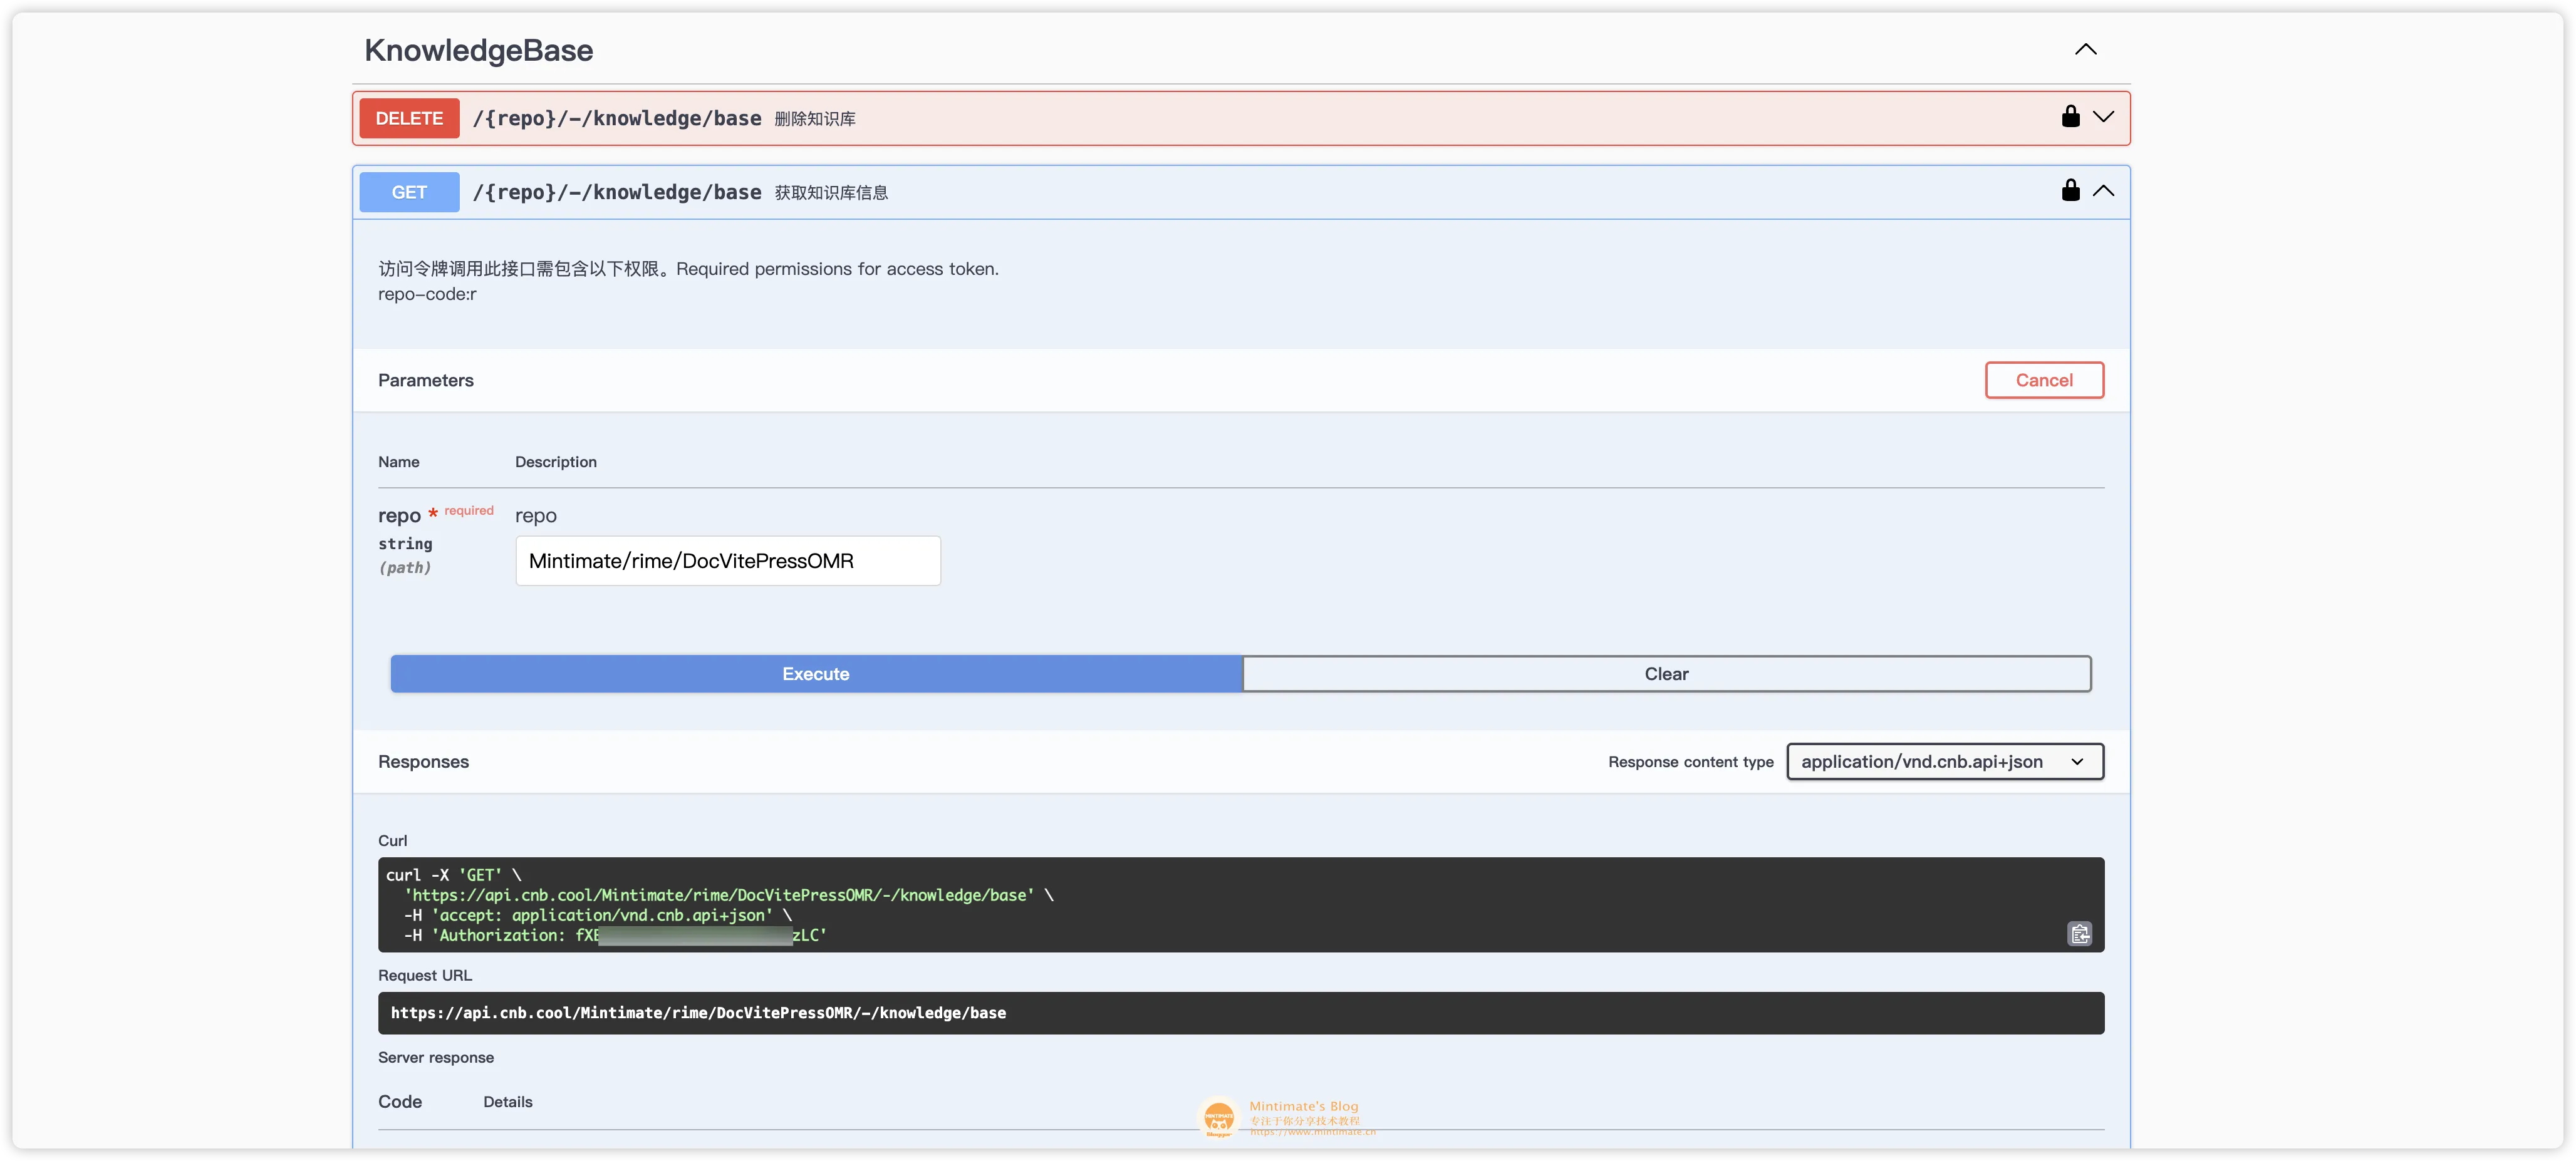
获得的知识库信息如下:
1 | |
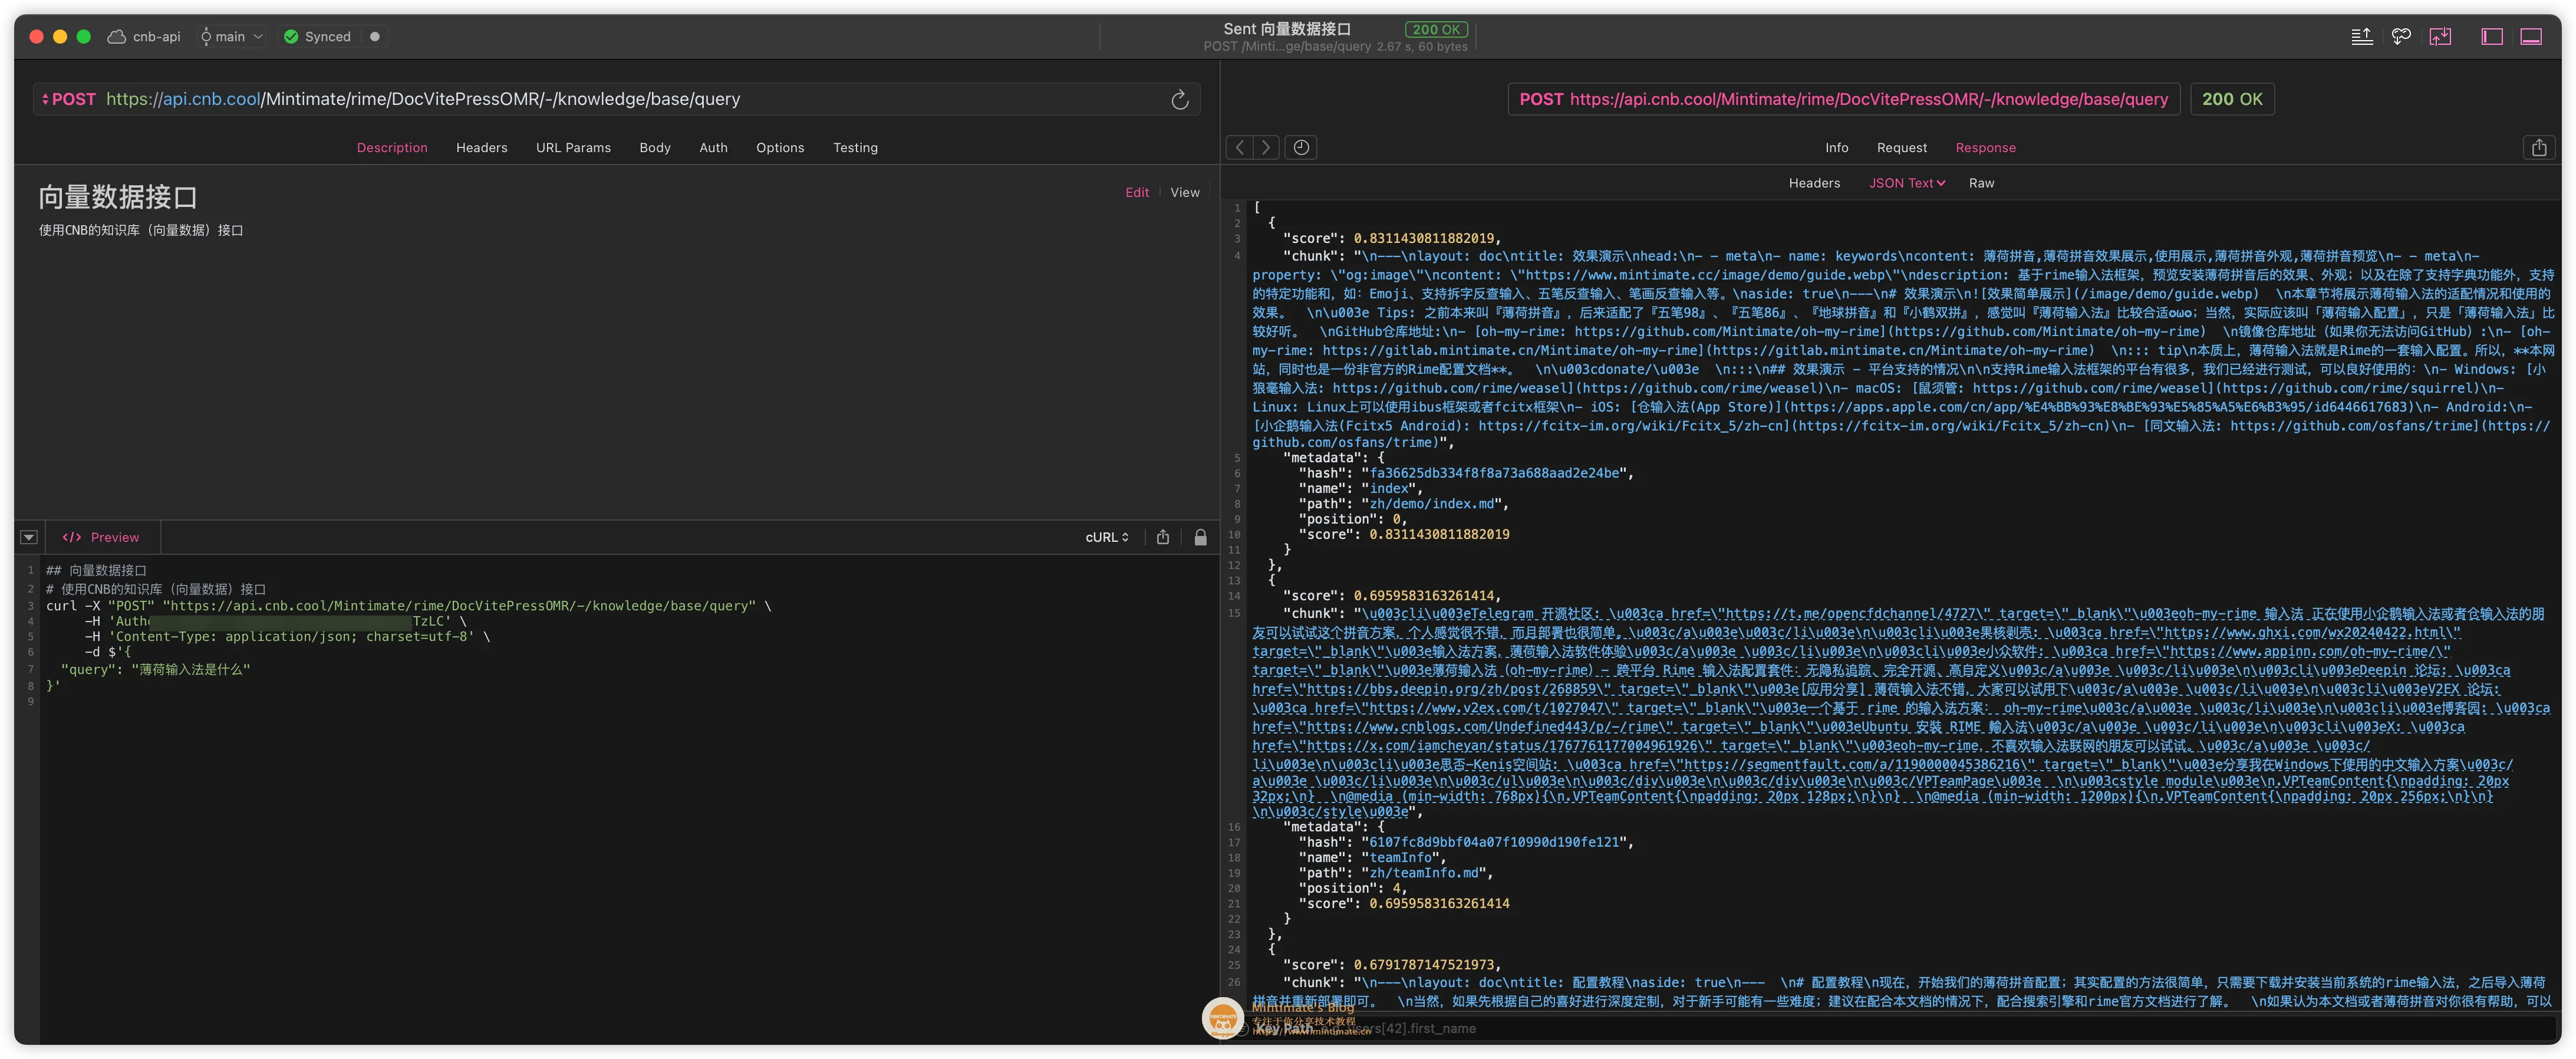
而我们查询数据库,就是需要 POST 请求 CNB 的知识库 API,比如:
1 | |
其中:
Authorization是 CNB 的 API 访问令牌,可以在 CNB 的个人中心获取。Mintimate/rime/DocVitePressOMR是 CNB 的仓库地址,也就是你的 VitePress 项目仓库地址。"query": "薄荷输入法是什么"是查询语句。
问答服务层 (MCP)
接下来,向量数据已经通过 CNB 的知识库 API 接口实现。 至于 LLM 的 API,正如开头所说的,推荐使用 DeepSeek 的 R1 或 V3 模型 API(通过配置指定:模型 ID deepseek-chat 或 deepseek-reasoner,API 调用地址 https://api.deepseek.com/v1)。
为了将大模型和我们的 CNB 知识库关联起来,我们需要搭建一个 RAG 问答服务,并在服务中应用 MCP 的理念。目前这里提供两套方案:
方案一:独立部署 Go 服务
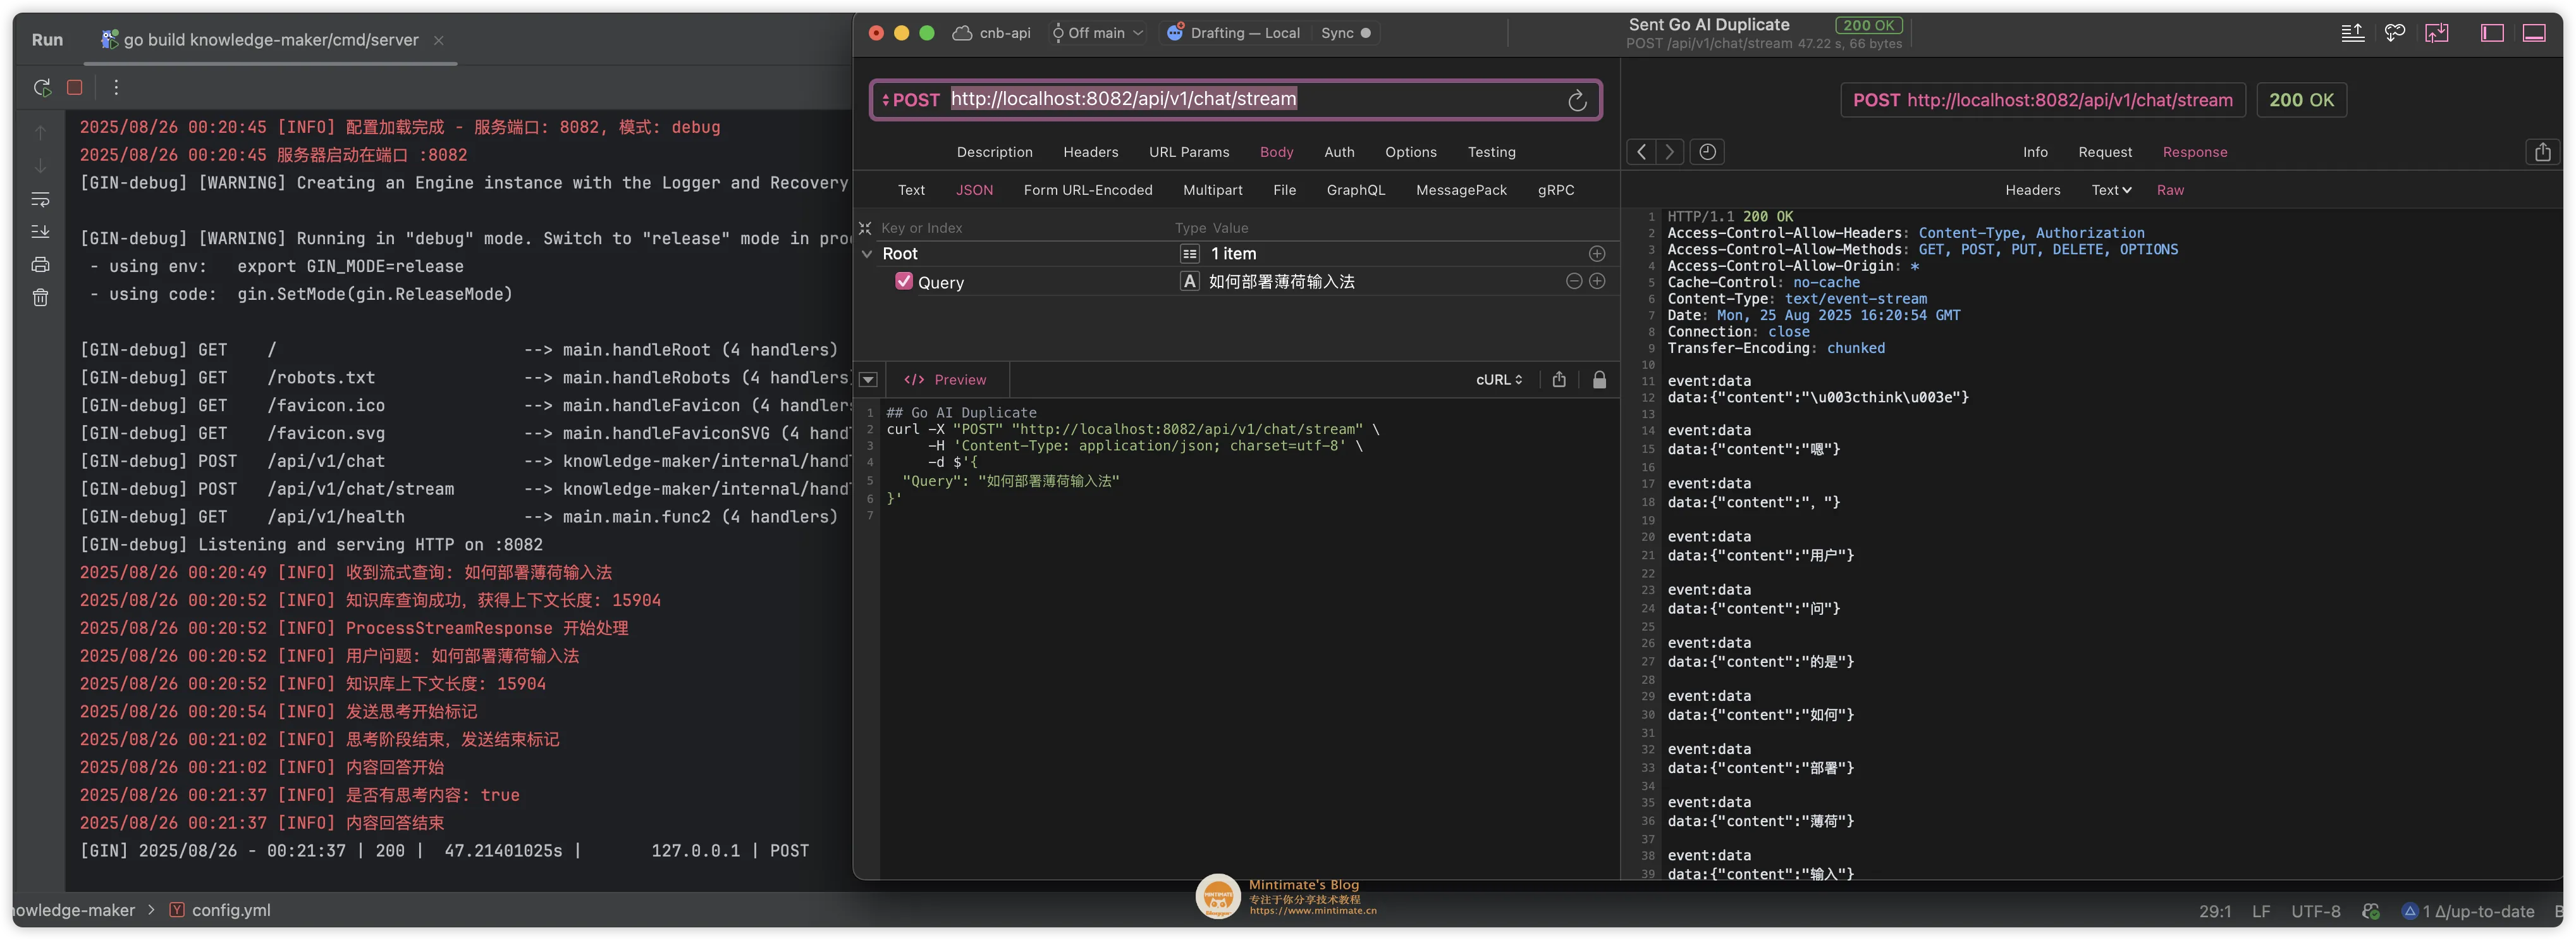
你可以直接用我写的 Go 语言版本开源项目(已经全面适配 Tool Use 和思考链展示):
这个 Go 版本允许通过配置文件快速接入:
1 | |
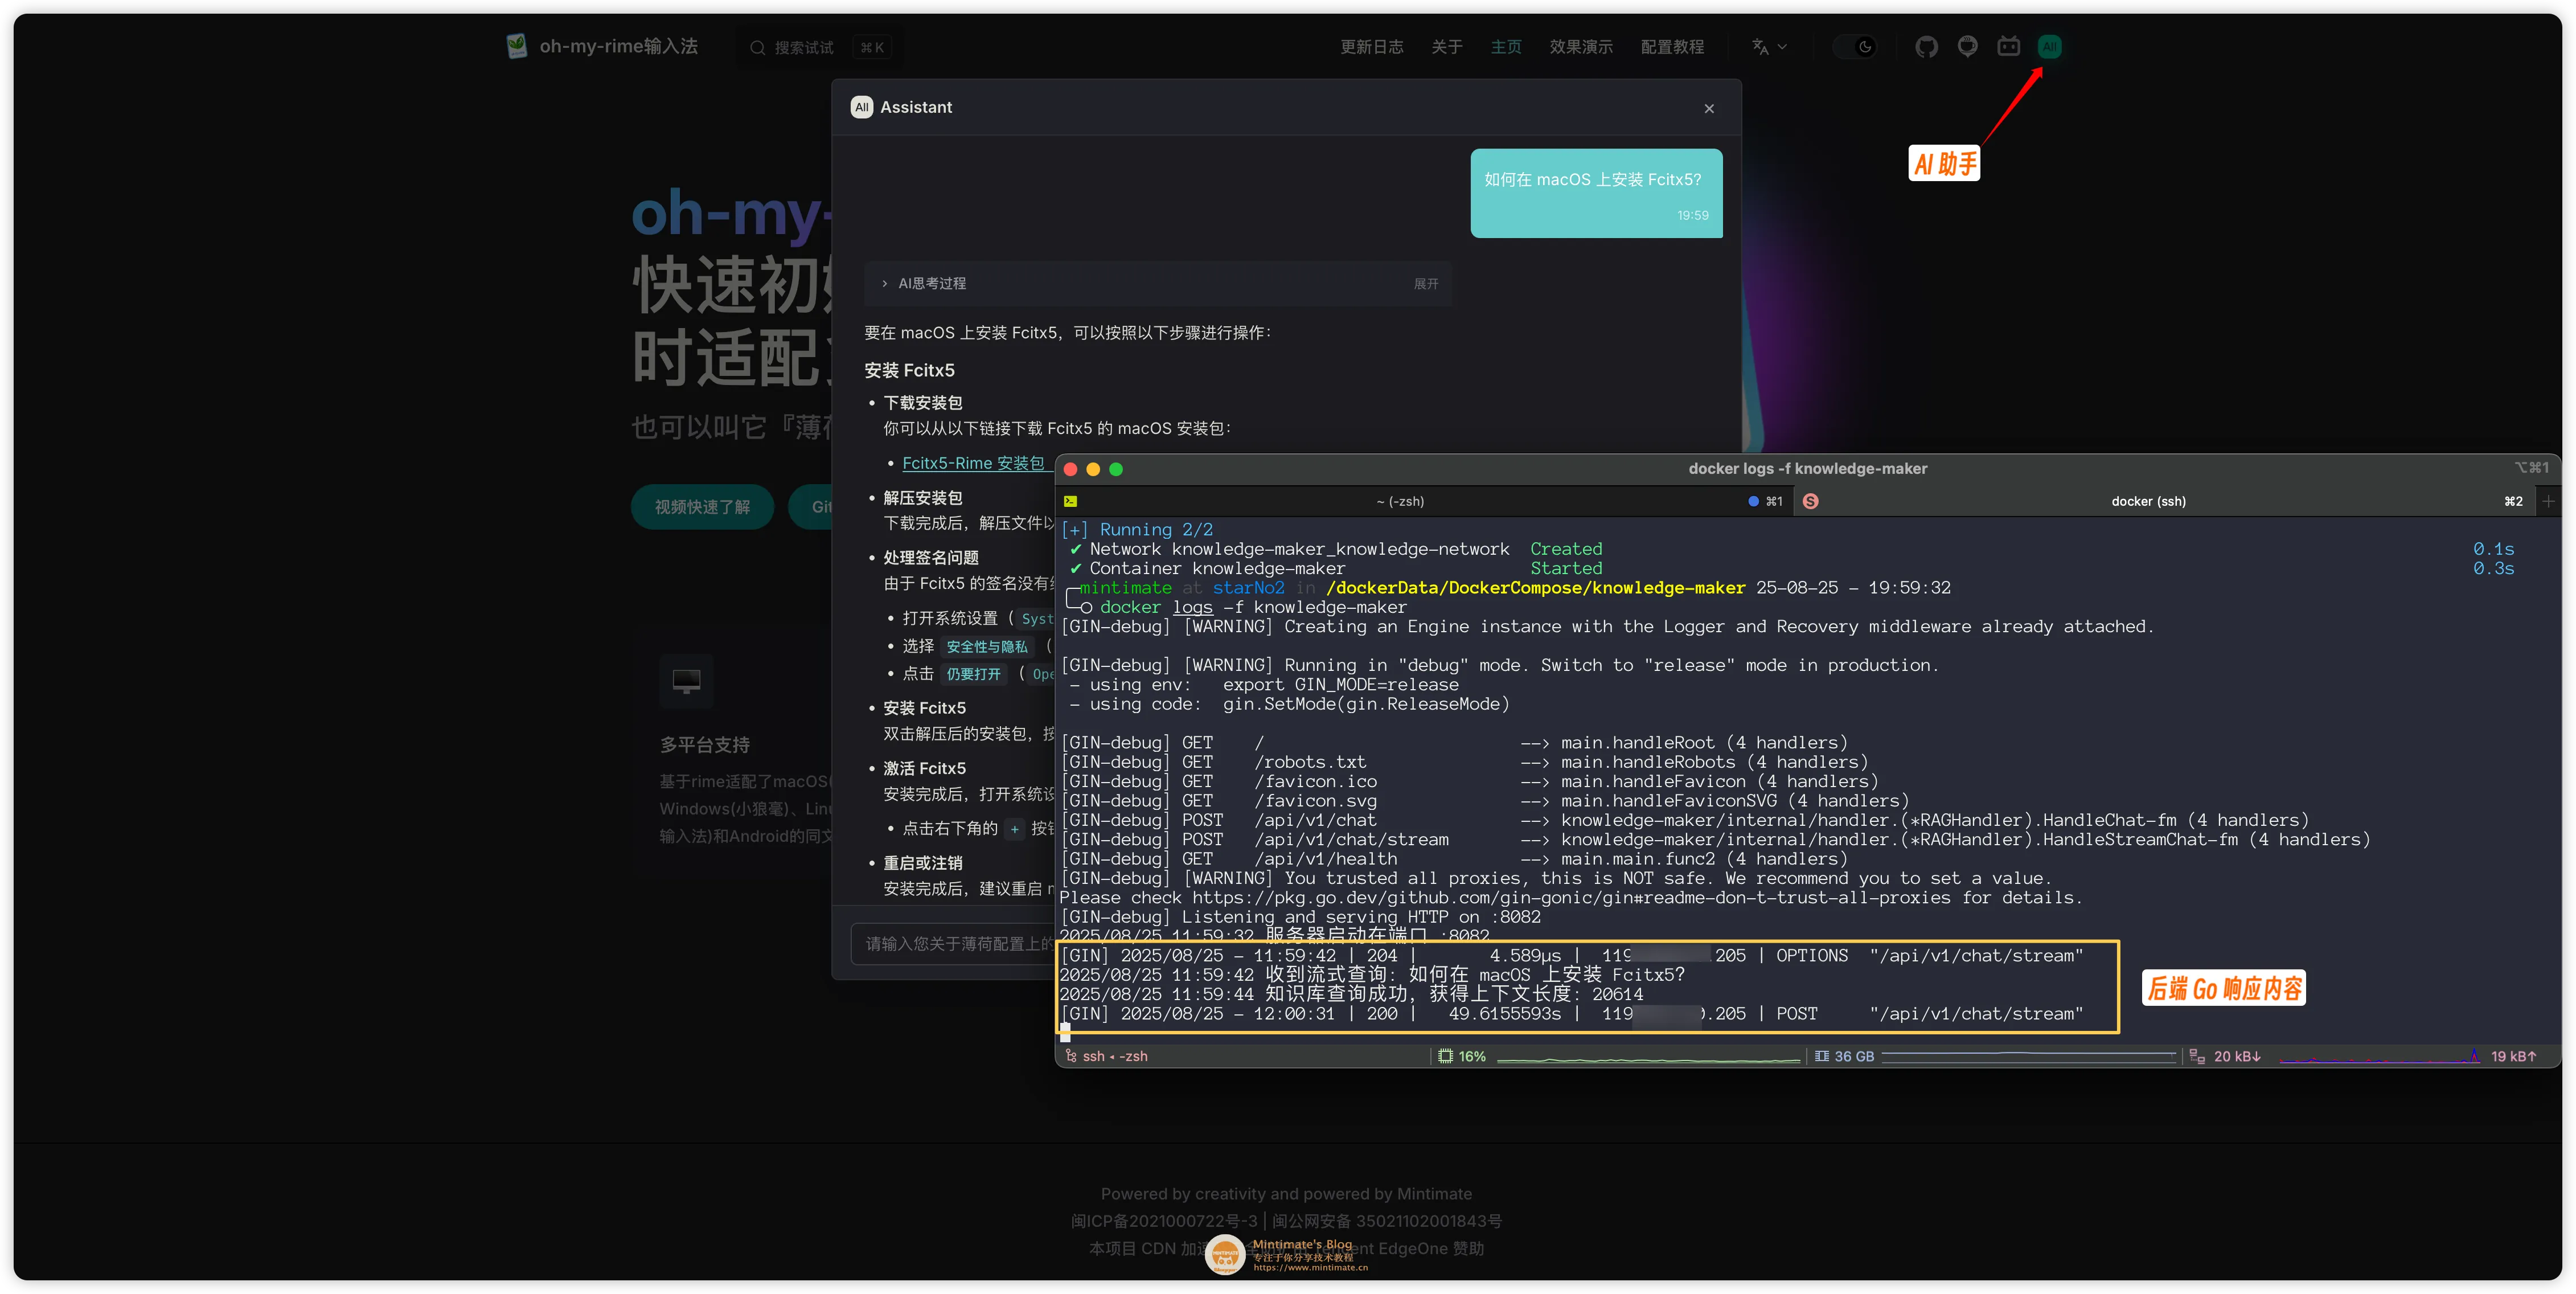
最后 API 请求的效果:
需要注意:
/api/v1/chat/stream: 是流式 API,返回的是一个流式数据。支持返回大模型的 Tool Calls 与结果。
方案二:EdgeOne 边缘函数
如果你觉得部署一个 Go 应用还是太重了,或者不想自己维护服务器,利用边缘计算(比如腾讯云 EdgeOne Pages Cloud Function)搭建一个轻量级的 纯无服务器 MCP 端点 则是目前强烈推荐的极客玩法!这也就是我目前薄荷输入法 VitePress 主题上所采纳的方案。
利用 Node.js 环境在边缘函数里暴露出一个 MCP API (实现 initialize, tools/list, tools/call 等标准 JSON-RPC 方法),前端只要把大模型的处理逻辑从后端搬到前端(用 JS 发起对话请求),当模型需要查知识库时,发指令给边缘函数,由函数去请求 CNB API:
- 暴露出
query_oh-my-rime(知识库检索,支持top_k参数控制返回数量)、get_download_links(获取下载链接)、get_author_info(获取作者信息)、get_schema_list(获取输入方案列表)等特定的 Tools 供前端使用。 - 内部直接对接 CNB 知识库查询接口,并遵循 MCP 协议版本
2025-03-26:
1 | |
由于运行在 EdgeOne Pages 无服务器上,完全省去了服务器维保和长时间运行产生资源的成本,且天然带有 CDN 缓存与低延迟。GET 请求还设置了 60s 缓存,大幅降低高频心跳探测导致的请求次数消耗。
VitePress 集成
VitePress 本身是基于 Vite 前端构建和 Vue 框架的静态网站生成器,所以我们可以使用 Vue 来实现一个组件,用于在 VitePress 中嵌入知识库检索框。
为了拥抱 MCP 和 Tool Calling 方案,我们在前端对代码进行了模块化重构,将原来的单文件 aiChat.vue 拆分为 aiChat/index.vue 入口组件 + composables/ 目录下的多个 Composables:
useChat.js:聊天核心逻辑,封装消息管理、历史记录、滚动控制等基础功能useToolCall.js:MCP 工具调用管理,封装 MCP 工具列表获取、工具调用、LLM 流式请求及 Tool Use 完整流程(第一轮 LLM → 工具调用 → 第二轮 LLM)useMarkdown.js:Markdown 渲染,封装 markdown-it 的初始化和文本转 HTML 逻辑useCaptcha.js:验证码管理,支持腾讯云、极验、Google reCAPTCHA、Cloudflare Turnstile 等多种验证码方案
流式请求与深层思考
大模型的回复是流式的,现在由于有了思考链(Reasoning)和工具调用(Tool Calls),我们需要在读取 SSE (Server-Sent Events) 流时分别处理。最新的实现中,后端会通过 event: 行标识事件类型(如 done、tool_calls),并在 data: 行中以 delta 对象分别传递 reasoning_content(思考内容)、content(正文内容)和 tool_calls(工具调用增量):
1 | |
解释一下:
reader.read()读取流式数据,配合大模型的响应输出进度。- 后端通过
delta.reasoning_content字段传递思考内容,前端将其实时渲染到可展开的折叠面板中;当delta.content开始出现时,自动折叠思考面板。 - 工具调用以增量方式通过
delta.tool_calls传递,前端按index聚合后,在 UI 层展示如 “⚡ 正在获取知识库” 的执行进度。 - 首轮 LLM 请求如果返回了
tool_calls,前端会自动调用 MCP 工具,再将工具结果回传 LLM 进行第二轮生成,实现完整的 Tool Use 流程。
流式请求的效果:
滚动与防抖
一般大模型的交互,都是自动滚动到底部的,所以我们需要在用户滑动页面时,判断是否需要自动滚动到底部。同时,为了防止用户频繁滑动,我们还需要添加防抖动。
1 | |
窗口拖拽调整大小
为了带来更好的跨端体验,聊天窗口支持拖拽调整大小。通过在窗口左下角添加一个 resize-handle,用户可以自由拖拽改变窗口宽高,同时限制了最小尺寸(320×400)和最大尺寸(不超过屏幕),在移动端则自动隐藏拖拽手柄并使用全屏布局:
1 | |
窗口尺寸通过 CSS 变量 --chat-width 和 --chat-height 驱动,响应式设计中不同断点有不同的默认值。
插件源码
最终,我们就可以在 VitePress 中嵌入知识库检索框了,相关的源码可以在我的 VitePress 上找到:
最终效果
最终的效果很简单,首先是 VitePress 上多了一个 AI 标签(现在它支持窗口自动 Resize 缩放,带来更好的跨端体验):
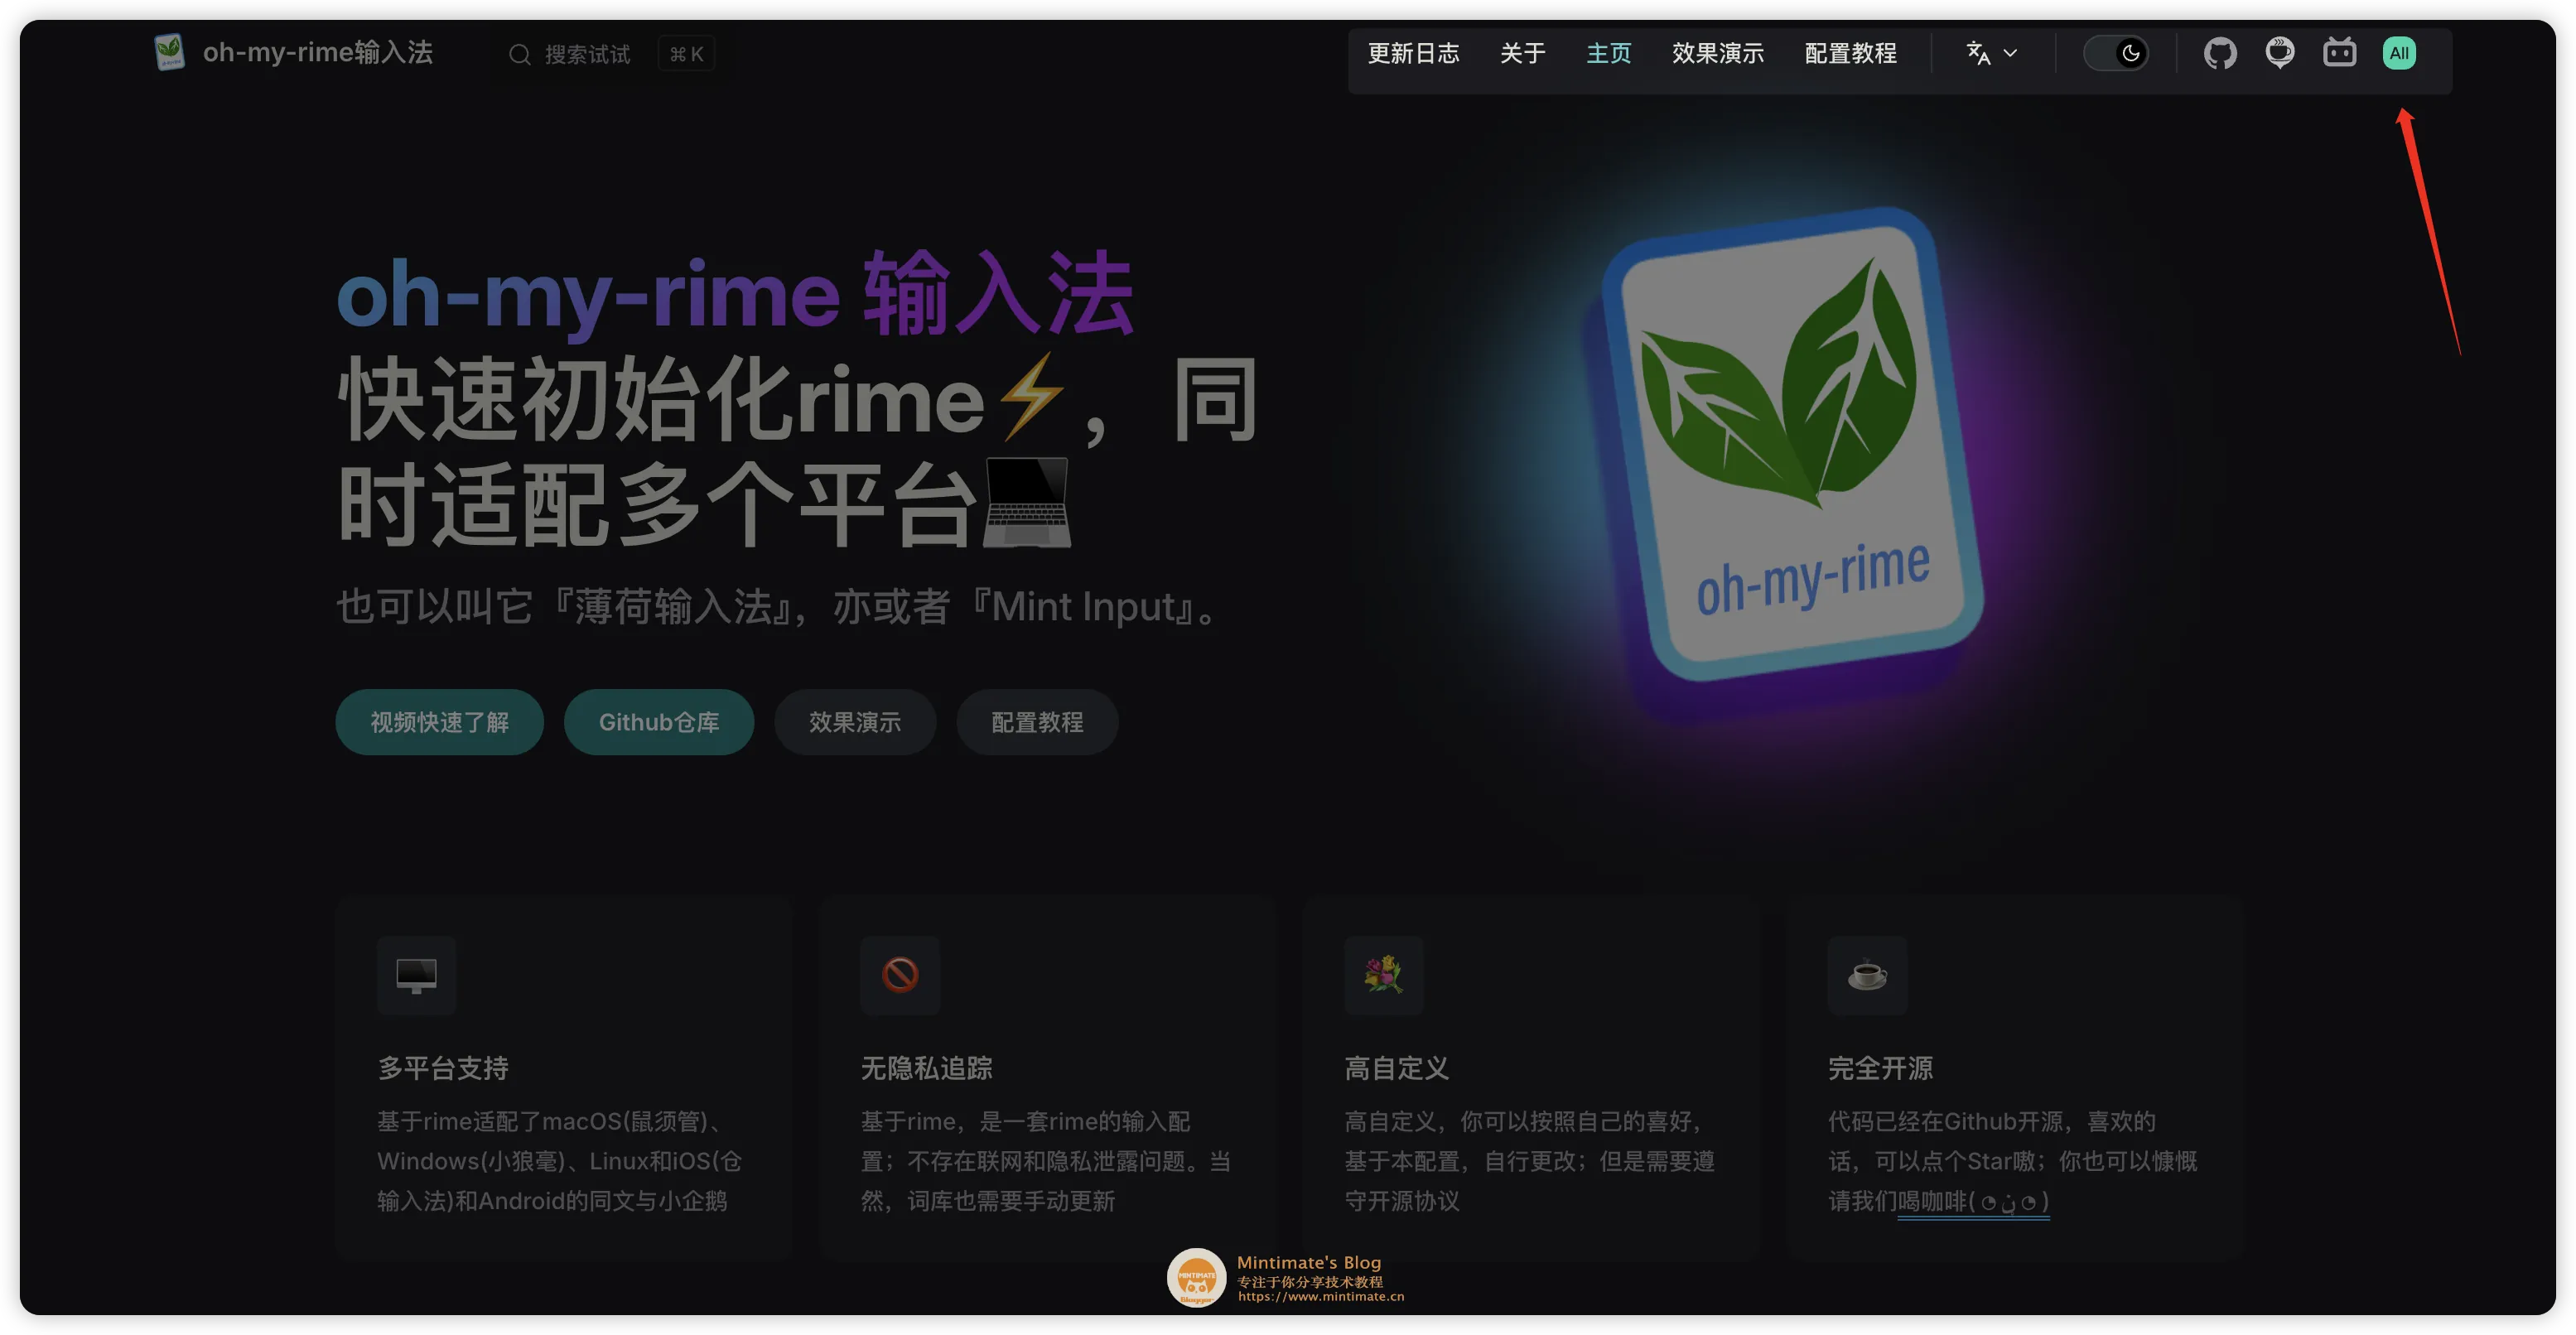
点击 AI 按钮,就会弹出知识库检索框:
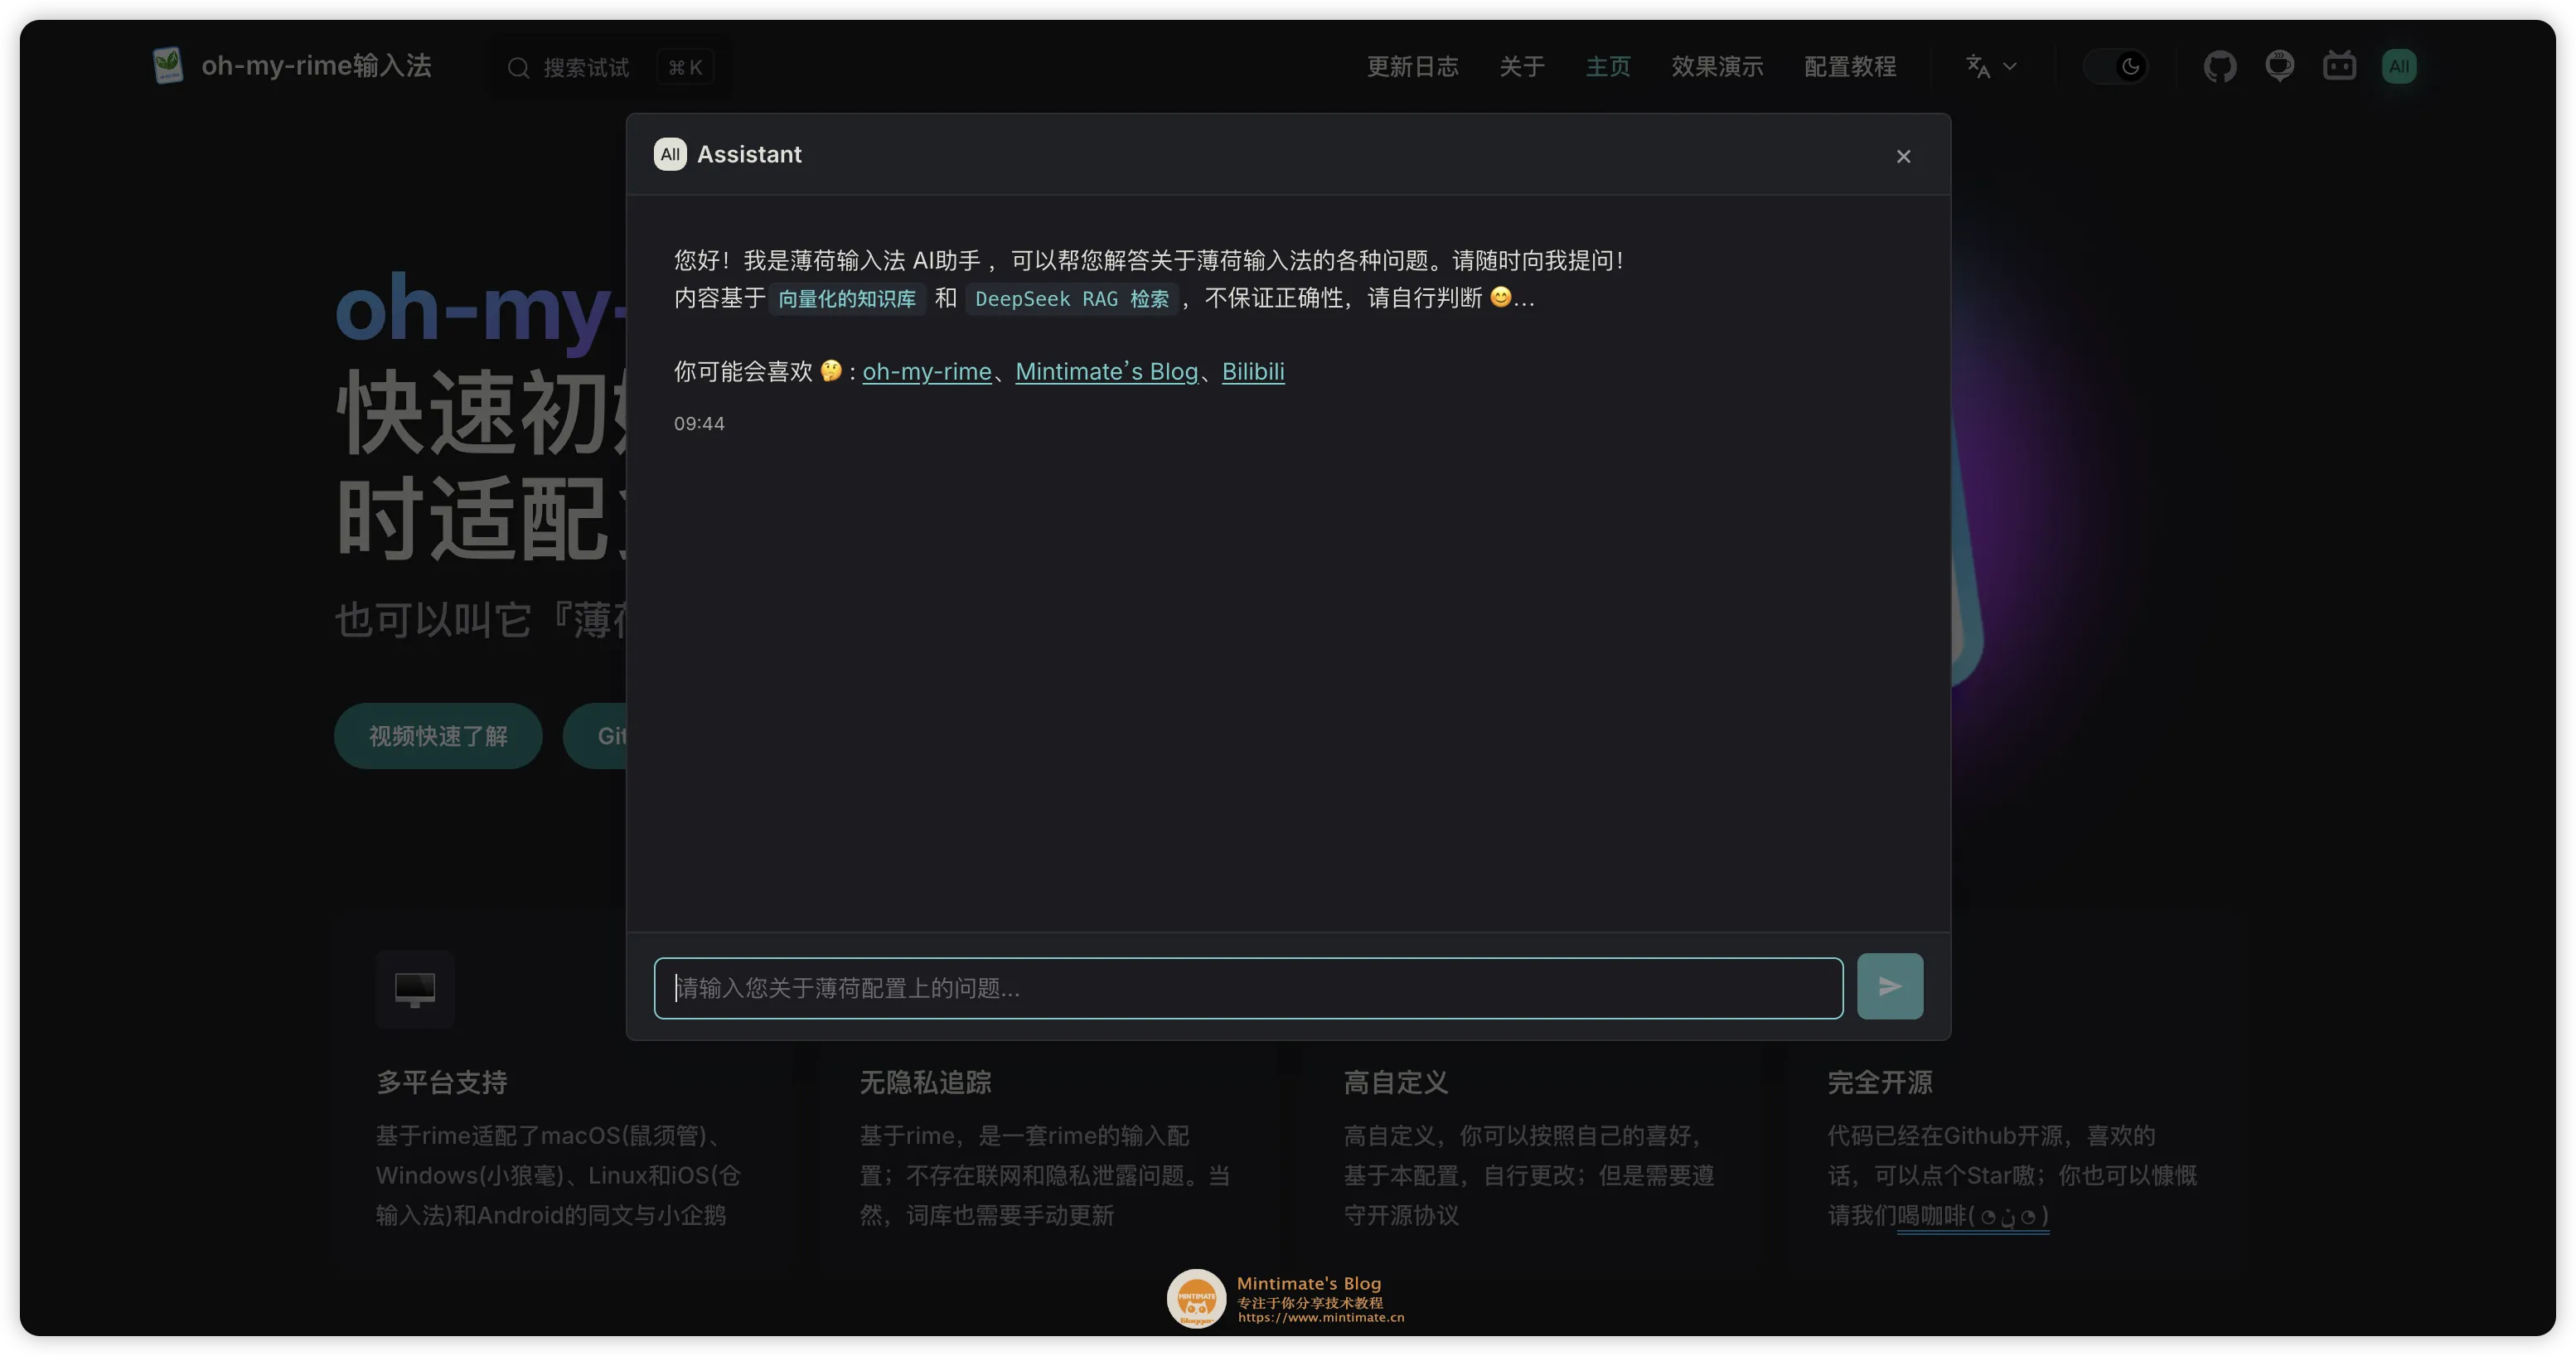
输入关键词,如果触发了知识查询工具就会展示如“⚡ 正在获取知识库”的状态 UI:
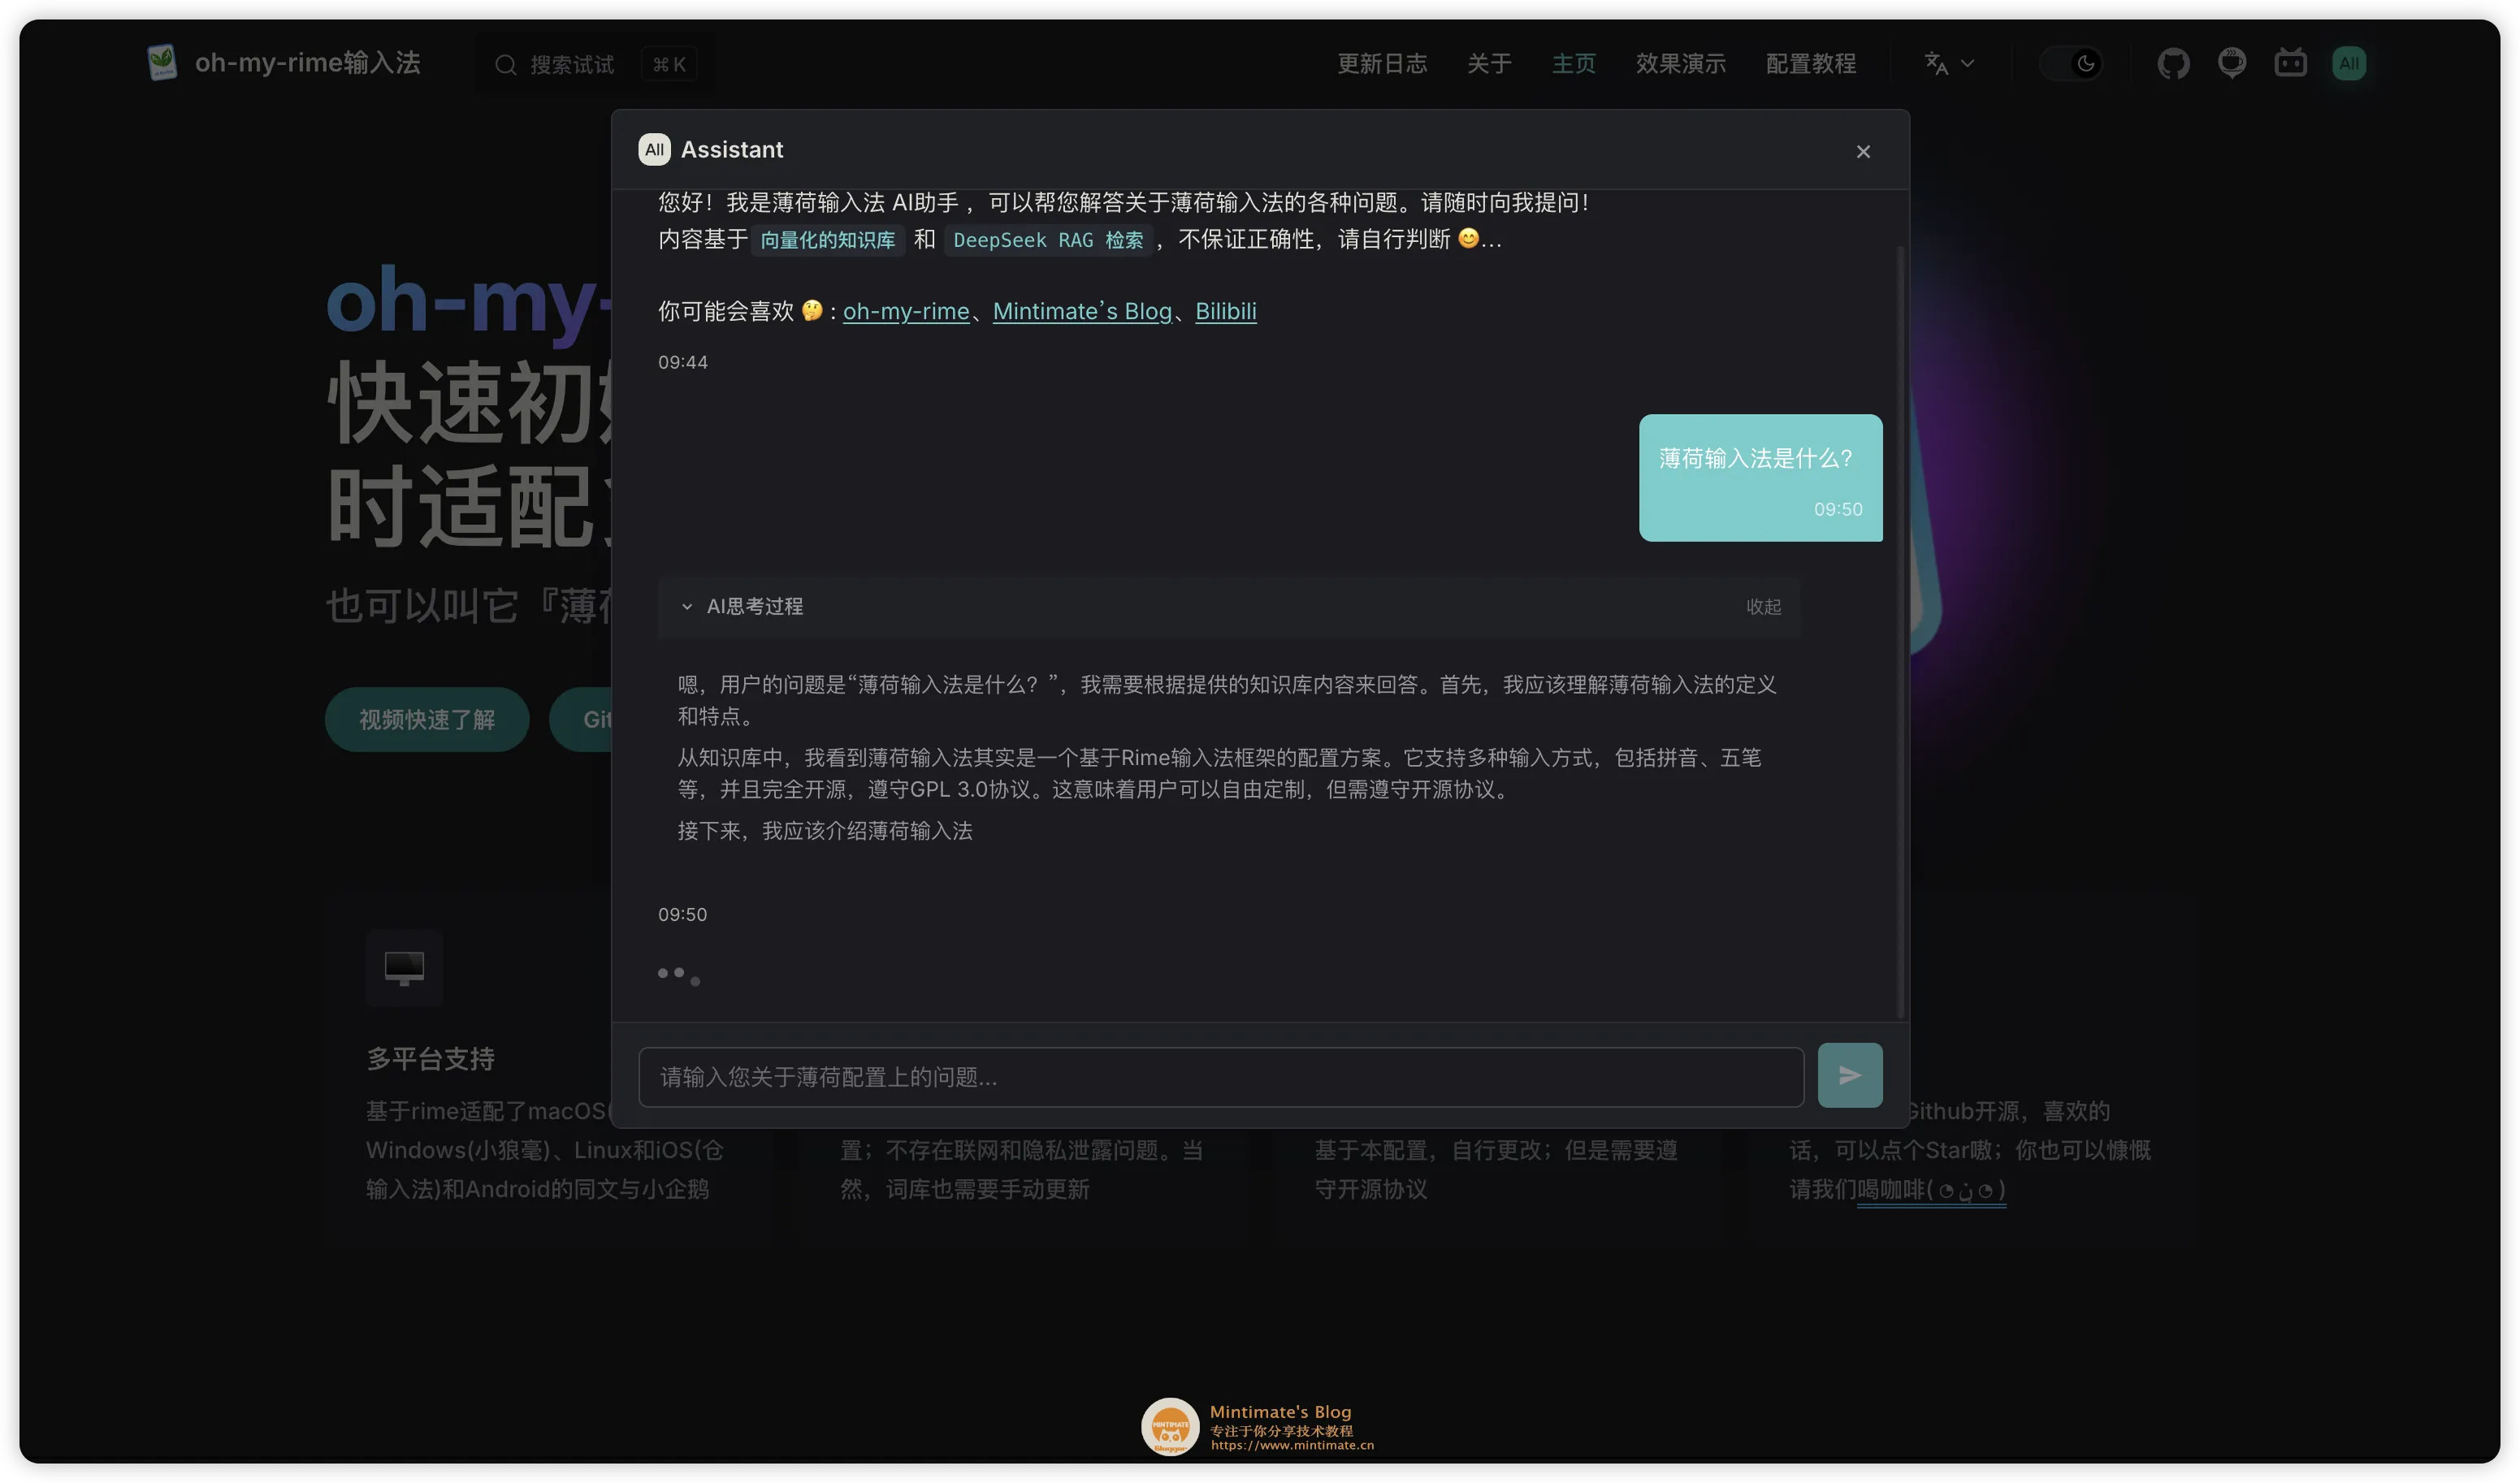
同时完美隔离并适配了思考内容 (Reasoning) 和回答正文,让大模型的思考过程透明展示给用户:
总结
从单纯的“分词相似度搜索 RAG”到如今大模型主动 Tool Calling (Agentic RAG) 并加入 MCP 规范化服务,整个体验有了质的飞跃。传统的 RAG 后端只负责搜;现在的 MCP + RAG 让大模型决定何时搜、怎么搜。
不管是继续保留成熟专业的 自建 Go 后端 作为强算力数据中转,还是像我一样尝试全 Serverless 边缘函数 (EdgeOne Pages) 享受免维护红利,这两套方案都能平滑地把 AI 智能助手挂载到你的静态博客或文档系统中。
我提供的 Go 代码和基于 Vue Composables 重构的前端(含 useChat、useToolCall、useMarkdown、useCaptcha 四个 Composables),遵循相对宽松的协议开源,你可以自由使用和二次开发。
最后,如果你觉得本篇教程对你有帮助,欢迎加入我们的开发者交流群: 812198734 ,一起交流学习,共同探索大模型技术的更多落地场景!